
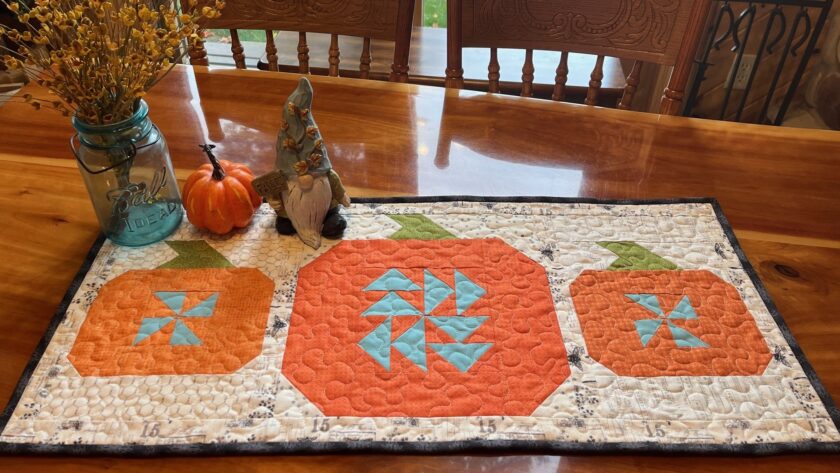
I love the crisp, sunny days of fall. And there is nothing quite like a trip to the pumpkin patch to get you in the autumn spirit.
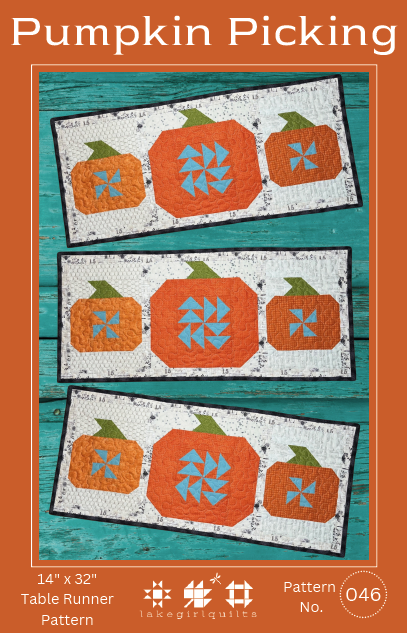
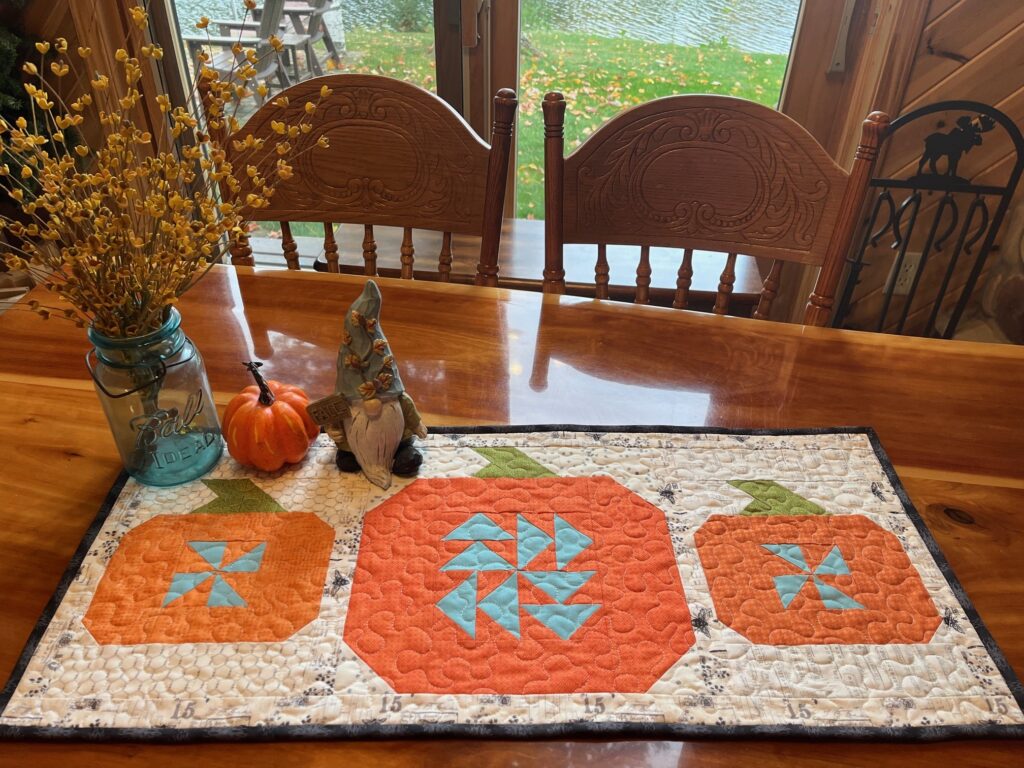
The Pumpkin Picking table runner was inspired by those simple fall days. It features three cheerful pumpkins surrounded by a scrappy background.
This pumpkin table runner is a fun way to bring a little fall quilting into your home. It is also a great project for using some of your favorite autumn fabrics and scraps.
Post contains affiliate links and we earn commissions if you shop through the links on this page, including Amazon Associate links. For more information please read the disclaimer on the Privacy Policy page.
A Fun Fall Quilting Project
The Pumpkin Picking table runner combines several traditional quilt piecing techniques.
You will make half square triangles, pinwheel units, flying geese, and snowball-style corners. The large pumpkin also features a Dutchman’s Puzzle unit.
Don’t let the variety of techniques intimidate you. Each unit is made separately and then assembled into the pumpkin blocks.
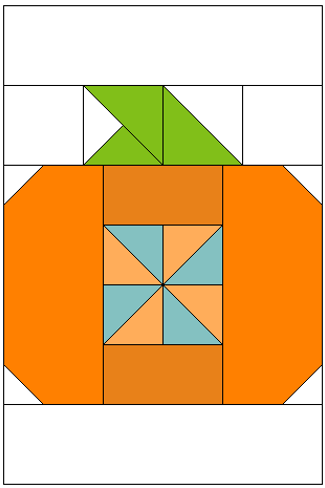
The pattern includes two smaller pumpkin blocks and one larger pumpkin block.
Before You Begin
Take a few minutes to read through the entire pattern before cutting your fabric.
This is especially helpful when making a quilt pattern with several different pieced units.
Use a true 1/4″ seam allowance throughout the project unless otherwise noted. Press seams open as you go.
I also recommend carefully nesting and pinning seams before sewing. Accurate piecing will make assembling the pumpkin blocks much easier.
Yardage amounts are based on 45″ wide fabric.
Yardage for Pumpkin Picking Table Runner
Gather your favorite fall fabrics to make this cheerful pumpkin table runner!
You’ll need 1/2 yard of background fabric and 1/2 yard of pumpkin fabric. For the pumpkin centers, set aside 1/4 yard of fabric, along with 1/8 yard for the stems. You’ll also need 1/4 yard of binding fabric and 5/8 yard of backing fabric.
All yardage amounts are based on 45″ wide fabric.
Have fun mixing and matching your favorite fall prints for a scrappy, whimsical look!
All yardage amounts are based on 45″ wide fabric.
Have fun mixing and matching your favorite fall prints for a scrappy, whimsical look!
Cutting the Little Pumpkin Blocks
You will make two little pumpkin blocks, each measuring 8 1/2″ x 12 1/2″ when finished.
Background Fabric
For each set of little pumpkin blocks, cut:
- 8 — 1 1/2″ x 1 1/2″ squares
- 8 — 2 1/2″ x 2 1/2″ squares
- 4 — 2 1/2″ x 8 1/2″ rectangles
Pumpkin Fabric
Cut:
- 8 — 2″ x 2″ squares
- 4 — 2″ x 3 1/2″ rectangles
- 4 — 3″ x 6 1/2″ rectangles
Center of Pumpkin Fabric
Cut:
- 8 — 2″ x 2″ squares
Stem Fabric
Cut:
- 6 — 2 1/2″ x 2 1/2″ squares
These pieces will be used to make the HSTs, pinwheels, stem rows, and pumpkin side units.
Making the Little Pumpkin Blocks
The two smaller pumpkins are made with several pieced units.
Start by making the pumpkin and center half square triangles. These small HSTs form the center of the pumpkin.
Make the Half Square Triangle Units
Using a fine pencil or washable marking pen, draw a diagonal line on the wrong side of a 2″ pumpkin square.
Place a 2″ center fabric square and the marked pumpkin square right sides together.
With the diagonal line facing up, sew directly on the marked line.
Press the HST open.
Trim away the bottom two layers 1/4″ from the seam. The finished HST should measure 2″ square. Trim if needed.
Repeat to make eight 2″ pumpkin/center HST units.

Make the Pinwheel Units
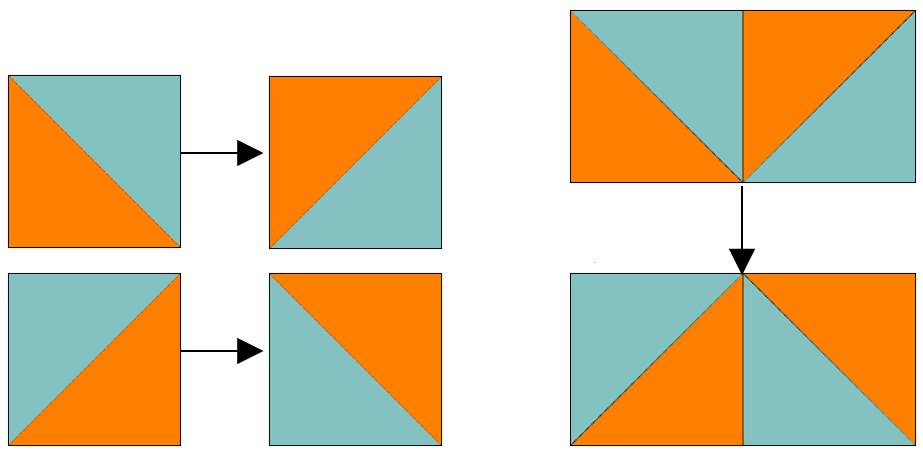
Rotate four HST units to form a pinwheel.
Sew the HSTs together to form two rows. Then sew the rows together to complete the pinwheel.
Repeat to make two 3 1/2″ x 3 1/2″ pinwheels.
Make the Pumpkin Stems
The stem is made from a combination of a 2 1/2″ HST unit and a unique 2 1/2″ unit made from an HST and a square.
Follow the same steps used to make the pumpkin/center HST units. This time, use 2 1/2″ squares.
Make four 2 1/2″ stem/background HST units.
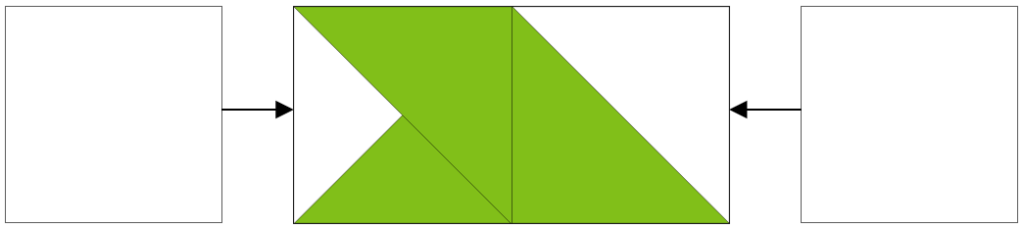
Draw a diagonal line on a remaining 2 1/2″ stem square.
Place one stem/background HST right sides together with the marked stem square. The diagonal line and the seam of the HST should face in opposite directions.
Make sure the stem section of the HST is positioned on the bottom right.
Sew along the diagonal line.
Press the stem square open. Trim the bottom two layers 1/4″ from the seam.
Repeat to make two unique stem units.

Align each unique stem unit with a stem/background HST and sew together.

Then sew a 2 1/2″ background square to each side of the stem unit.
This completes the stem row.
Repeat to make two stem rows.
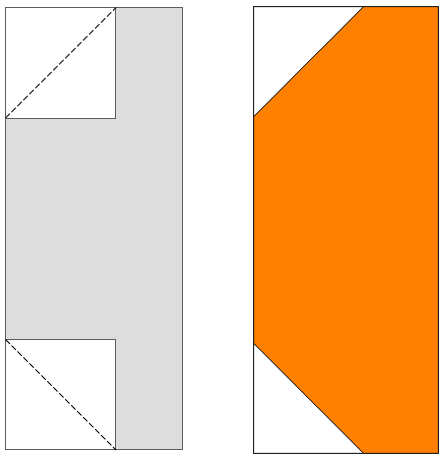
Make the Pumpkin Side Units
Draw a diagonal line on each 1 1/2″ background square.
Sew a background square to two corners of a 3″ x 6 1/2″ pumpkin rectangle. Sew the squares to the same 6 1/2″ side.
Press the corners open.
Trim the bottom two layers 1/4″ from the seam.
Repeat to make four side units.
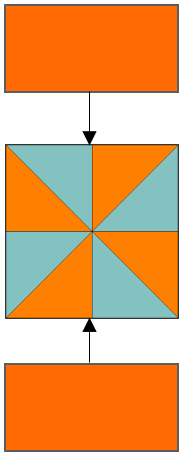
Assemble the Little Pumpkin Row
Sew a 2″ x 3 1/2″ pumpkin rectangle to the top and bottom of a pinwheel unit.
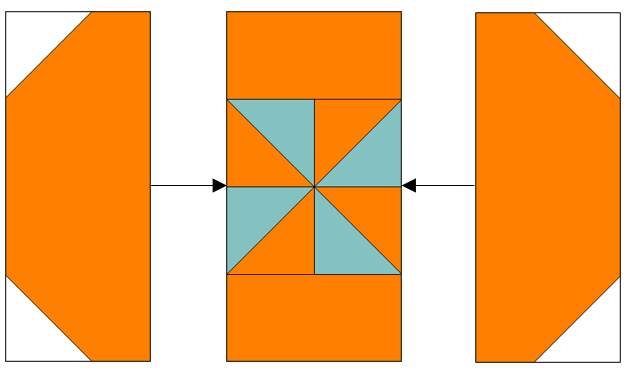
Add a side unit to each side.
Rotate the side units so the corners are all facing outward.
Repeat to make two pumpkin rows.
Assemble the Little Pumpkin Blocks
Sew the stem row to the top of the pumpkin row.
Then sew a 2 1/2″ x 8 1/2″ background rectangle to the top and bottom.
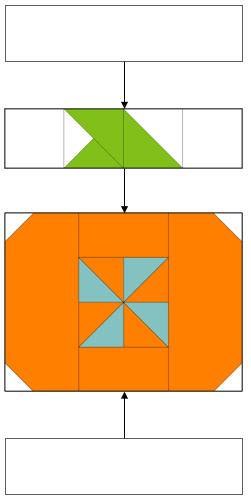
The finished little pumpkin block should measure 8 1/2″ x 12 1/2″.
Repeat to make two little pumpkin blocks.
Cutting the Big Pumpkin Block
You will make one big pumpkin block, which measures 12 1/2″ x 12 1/2″ when finished.
Background Fabric
Cut:
- 6 — 2 1/2″ x 2 1/2″ squares
- 2 — 2 1/2″ x 4 1/2″ rectangles
Pumpkin Fabric
Cut:
- 8 — 2 5/8″ x 2 5/8″ squares
- 2 — 2 1/2″ x 6 1/2″ rectangles
- 2 — 3 1/2″ x 10 1/2″ rectangles
Center of Pumpkin Fabric
Cut:
- 2 — 4 3/4″ x 4 3/4″ squares
Stem Fabric
Cut:
- 3 — 2 1/2″ x 2 1/2″ squares
Making the Big Pumpkin Block
The large pumpkin uses many of the same techniques as the little pumpkins.
The main difference is the center.
The large pumpkin features a Dutchman’s Puzzle quilt block made from four flying geese sections.
This traditional quilt block adds a little extra interest to the center of the pumpkin.
Make the Flying Geese Units
Draw a diagonal line on each 2 5/8″ pumpkin square.
Align two 2 5/8″ pumpkin squares on opposite corners of a 4 3/4″ center square, right sides together.
The diagonal lines should face up. The two smaller squares will overlap slightly in the middle.
Pin them in place.
Sew a 1/4″ seam on each side of the diagonal lines.
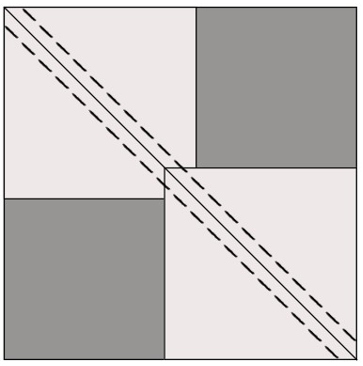
Cut apart on the drawn lines to separate the units.
Press the units open toward the pumpkin fabric.
For each unit, align another 2 5/8″ pumpkin square onto the remaining corner.
The diagonal line should face up.
Sew a 1/4″ seam on each side of the diagonal line.
Cut apart on the drawn line to create four flying geese.
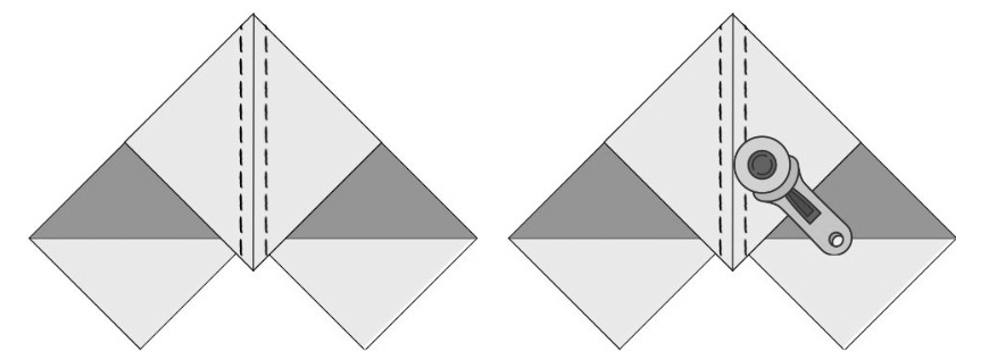
Press the flying geese open toward the pumpkin fabric.
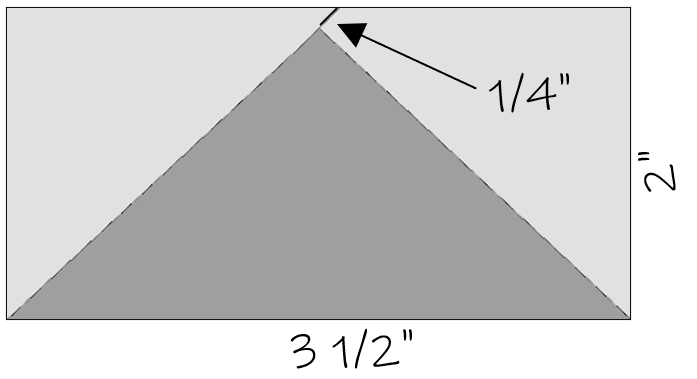
Trim the flying geese to 2″ high x 3 1/2″ wide.
When trimming, make sure to leave a 1/4″ seam allowance above the point of the “V.”
Assemble the Dutchman’s Puzzle Unit
Arrange the four flying geese units into four sections.
Sew each section together.
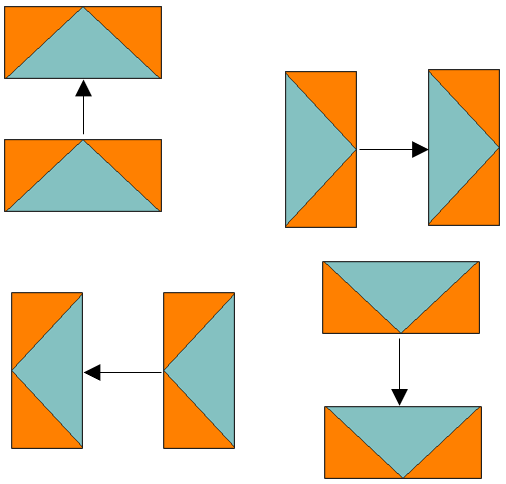
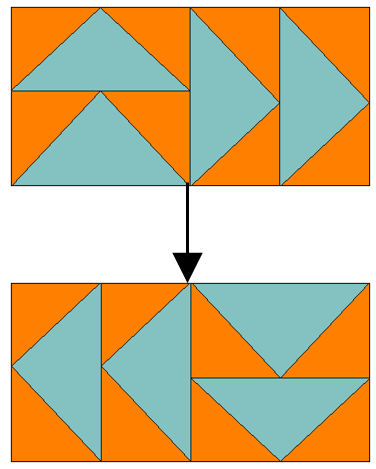
Keeping the same layout, sew the top two sections together. Then sew the bottom two sections together.
Sew the two rows together to complete the Dutchman’s Puzzle unit.
The finished unit should measure 6 1/2″ x 6 1/2″.
Make the Big Pumpkin Side Units
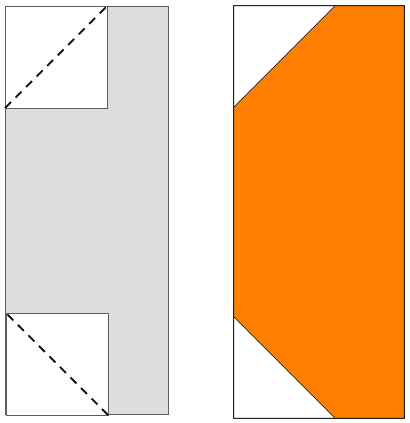
Draw a diagonal line on four of the 2 1/2″ background squares.
Sew a background square to two corners of a 3 1/2″ x 10 1/2″ pumpkin rectangle.
Sew both squares to the same 10 1/2″ side.
Press the corners open.
Trim the bottom two layers 1/4″ from the seam.
Assemble the Big Pumpkin Row
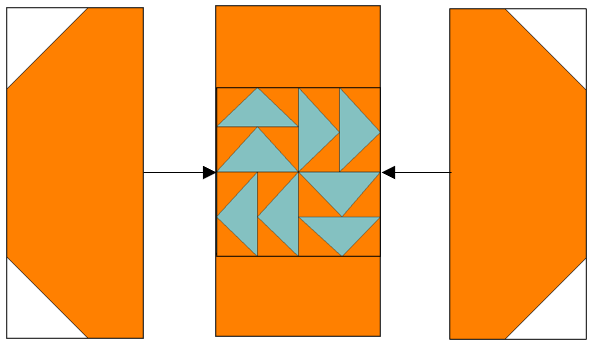
Sew a 2 1/2″ x 6 1/2″ pumpkin rectangle to the top and bottom of the Dutchman’s Puzzle unit.
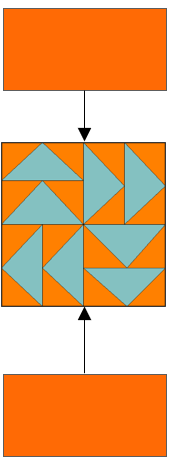
Add a side unit to each side.
Rotate the side units so the corners are all facing outward.
Make the Big Pumpkin Stem Row
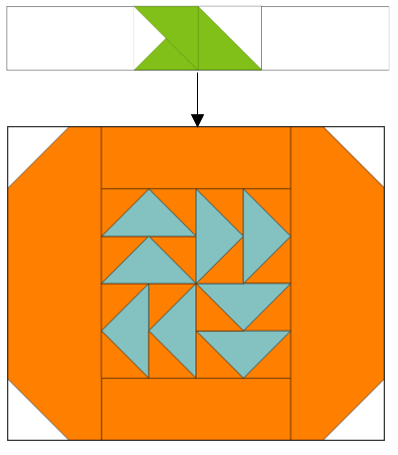
Follow the same directions used to make the little pumpkin stem row.
The stem row for the big pumpkin uses the remaining stem and background pieces from the cutting directions above. Except instead of sewing 2 1/2″ x 2 1/2″ pieces to each side sew 2 1/2″ x 4 1/2″ pieces to make the row measure 2 1/2″ x 12 1/2″.

Assemble the Big Pumpkin Block
Sew the stem row to the pumpkin row to finish the big pumpkin block.
The finished block should measure 12 1/2″ x 12 1/2″.
Trim if needed.
Cutting the Sashing and Borders
The background fabric is also used to join the pumpkin blocks and finish the table runner top.
Cut:
- 4 — 1 1/2″ x 12 1/2″ strips
- 2 — 1 1/2″ x 32 1/2″ strips
These strips will create the sashing between the pumpkin blocks and the borders along the top and bottom of the runner.
Assemble the Pumpkin Table Runner
Now comes the fun part!
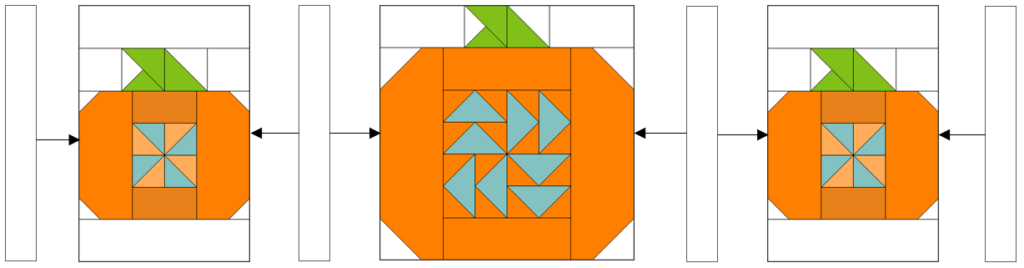
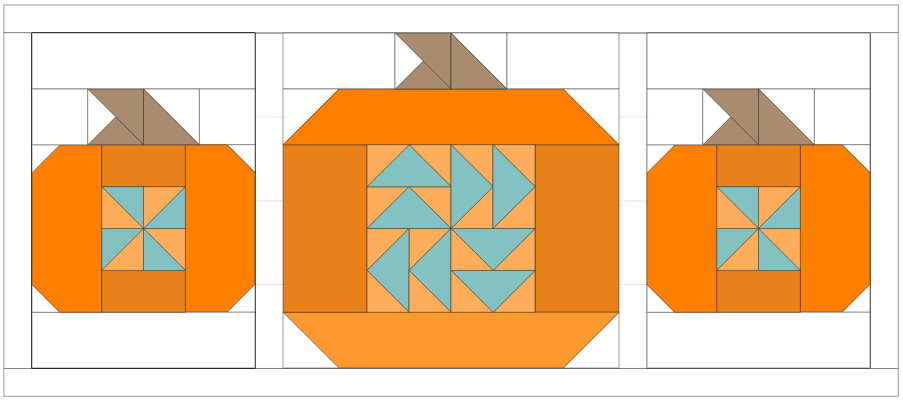
Arrange the three pumpkin blocks with the large pumpkin in the center and the two smaller pumpkins on either side.
Sew a 1 1/2″ x 12 1/2″ background strip between each pumpkin block.
Add another strip to the outside of each little pumpkin.
Finally, sew a 1 1/2″ x 32 1/2″ strip to the top and bottom of the runner.
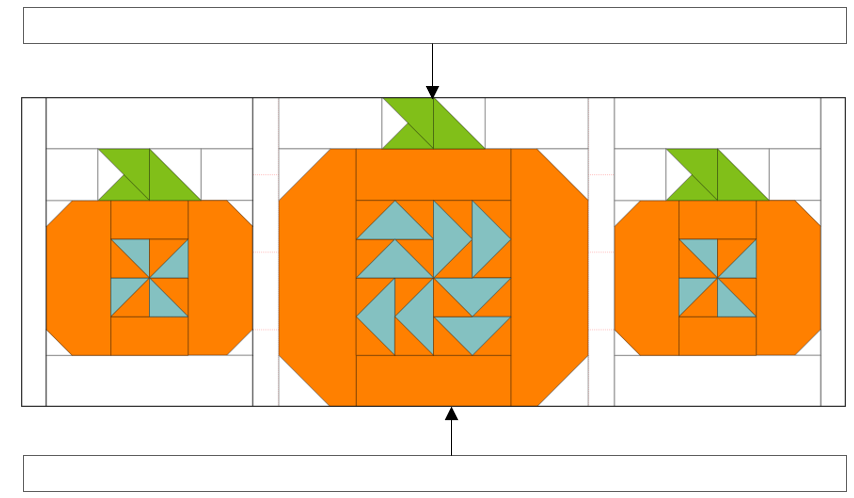
Your fall table runner quilt top is now complete.
Take a moment to check your seams and make sure everything is laying flat before moving on to quilting.
Finishing Your Fall Table Runner
Once the quilt top is finished, it’s time to add the backing and batting.
Cutting the Backing
Cut:
- 1 — 20″ x 36″ piece of backing fabric
This provides at least 2″ of overhang around all four edges of the quilt top.
The seam in the backing will run vertically down the quilt back.
Cutting the Batting
Cut:
- 1 — 20″ x 36″ piece of thin cotton batting
Layer the backing, batting, and quilt top.
Baste using your preferred method.
Quilting the Table Runner
Now it’s time to quilt your pumpkin table runner.
Choose a quilting design that complements the pumpkins.
An overall meandering quilting design is a simple choice for this autumn quilt project. You could also use loops, leaves, swirls, or another favorite free-motion quilting design.
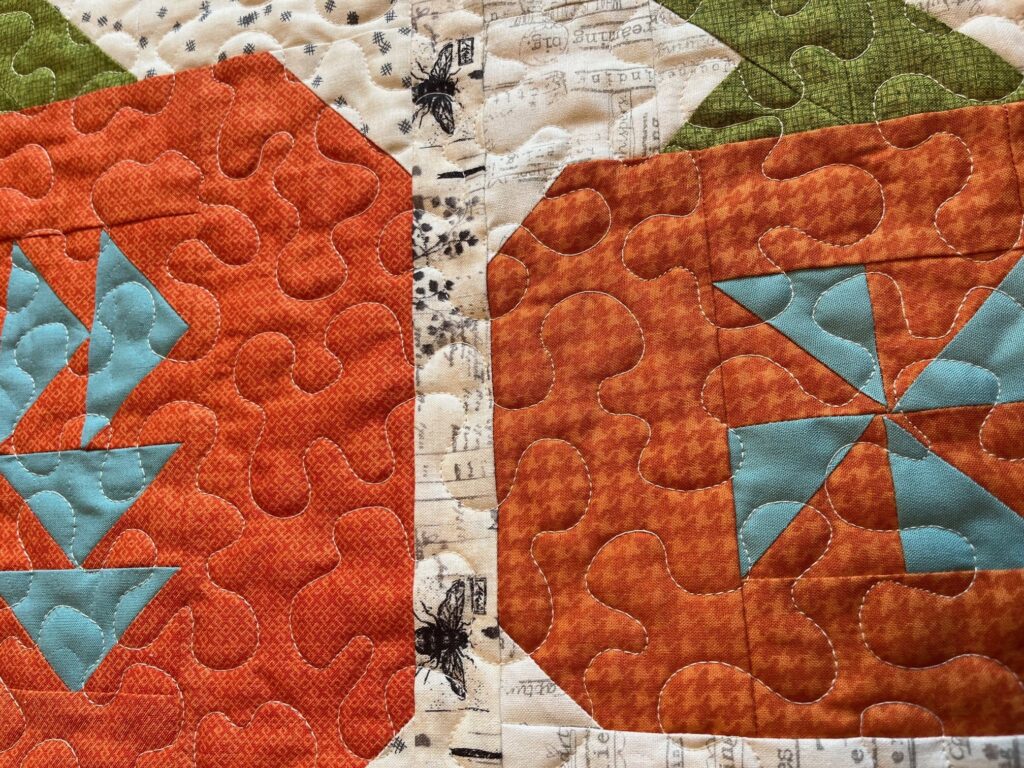
After quilting, trim away the excess batting and backing.
Cutting and Preparing the Binding
Cut:
- 3 — 2 1/2″ x Width of Fabric binding strips
Fold each strip in half, end to end.
Use the 45° line on your ruler to trim the ends at a 45° angle.
When opened, the angles should face in opposite directions.
Place the ends of two strips perpendicular, right sides together.
Sew a 1/4″ seam.
Repeat to join all three strips into one long binding strip.
Press the seams open.
Then fold the binding in half lengthwise with the right side facing out.
My Majestic Maple mini quilt post shows and explains all these details to help you add the binding!
Add the Binding
Attach the binding to your quilt using your preferred binding method.
Once the binding is sewn in place, give your finished runner a final press.
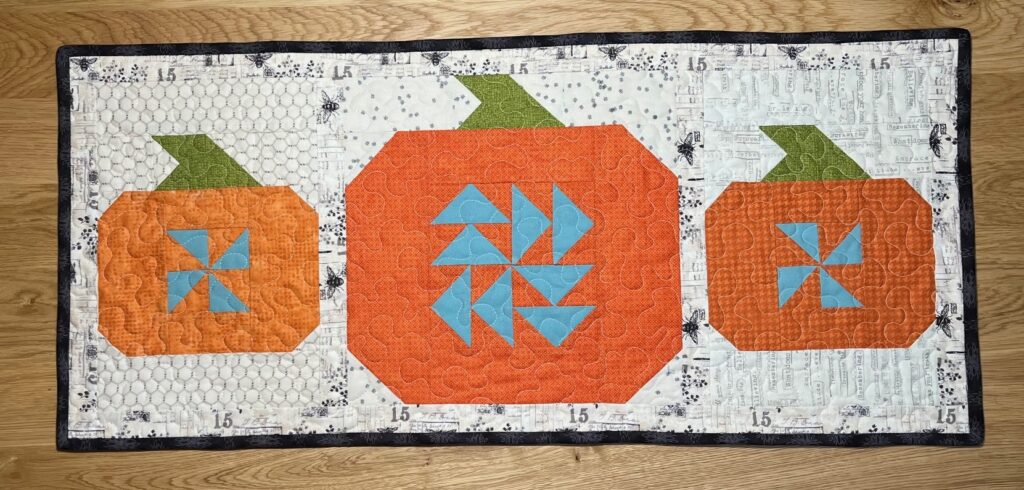
Your Pumpkin Picking table runner is ready to enjoy!
Decorating With Your Pumpkin Table Runner
There are lots of places to display this little quilt.
Try it on your dining room table for Thanksgiving. Or use it on a kitchen island, buffet, coffee table, or entryway.
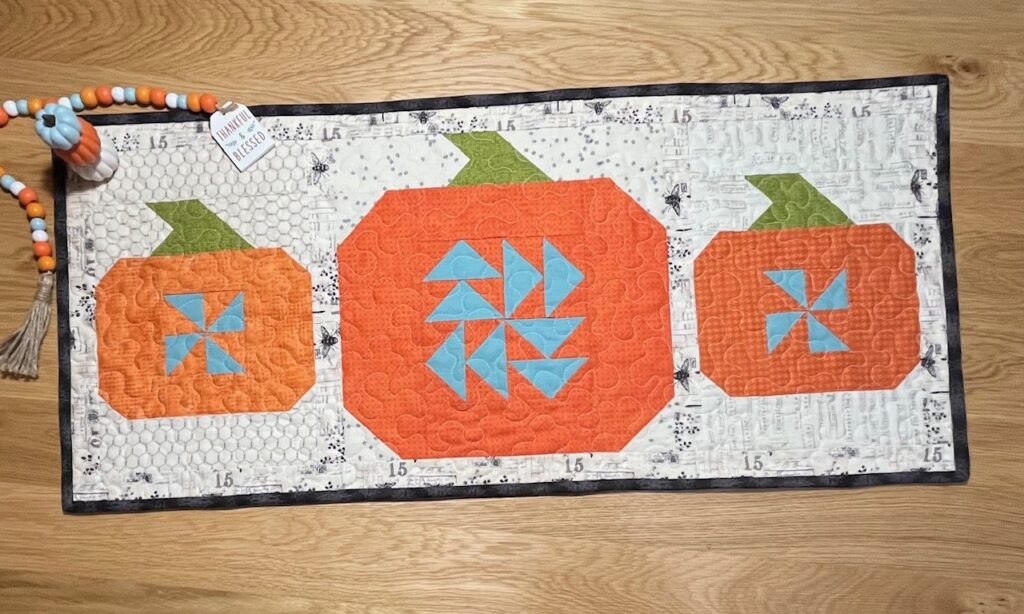
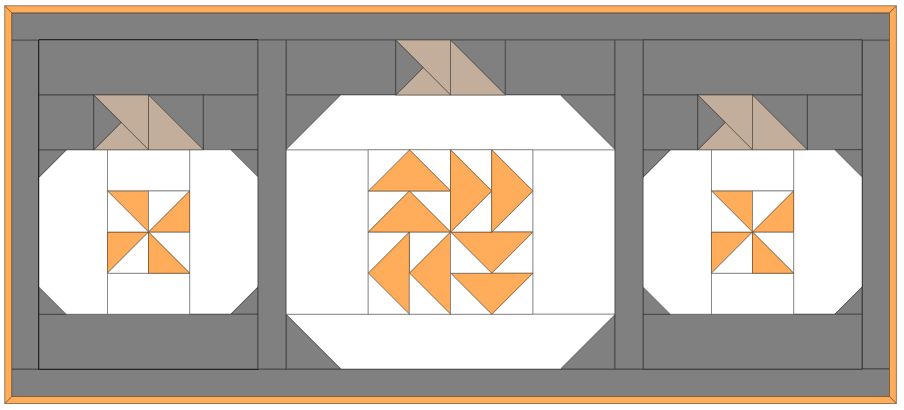
You can also change the look simply by changing your fabric choices.
Try traditional oranges and golds for a classic fall look. Or use unexpected colors for a more whimsical pumpkin quilt pattern. I love the white pumpkins on a dark gray background version!!
This would also be a great project for using a collection of fall scraps you’ve been saving.
More Fall Quilting Ideas
If you enjoy seasonal quilting, this pumpkin table runner is a great project to add to your fall quilting list.
It is small enough to finish without committing to a large quilt. At the same time, it gives you the opportunity to practice several useful quilting techniques.
And, of course, there is something especially satisfying about making a quilt that can come out year after year when the leaves begin to change.
A few other fun, fall quilt projects to check out are my Majestic Maple or Pumpkin Patch mini quilts!
Enjoy Your Pumpkin Picking Table Runner!
I hope this little Pumpkin Picking table runner brings a bit of pumpkin-patch fun to your home.
Choose your favorite fall fabrics. Mix in a few scraps. And enjoy watching these cheerful pumpkins come together.
Happy quilting!

Thank you!
Thank you! Your patterns are always appreciated.
Thank you for the cute pattern! I’d like to get one made before October is over, but I’m guessing I’ll only get the fabric pulled. Too many projects!