Whether you’re a seasoned quilter looking to streamline your workflow or a beginner eager to learn new techniques, mastering the four-at-a-time half-square triangle method will revolutionize the way you approach half square triangles (HST) in your projects.
Embarking on a quilting project is always an exciting journey, but the joy can be tempered by the repetitive nature of certain techniques, especially when dealing with half-square triangles (HSTs).
However, there’s a game-changing method that not only expedites the process but also ensures precision and consistency in your quilt blocks — the four-at-a-time HST technique!
In this blog post, I’ll delve into the world of efficient quilting and explore the step-by-step process of creating four HSTs simultaneously.
Join me as I uncover the advantages of this technique, share practical tips for choosing square sizes, and guide you through the process of creating beautiful, identical HST units. Get ready to elevate your quilting experience and infuse a new level of efficiency into your creative endeavors. Let’s dive in!
Post contains affiliate links and we earn commissions if you shop through the links on this page, including Amazon Associate links. For more information please read the disclaimer on the Privacy Policy page.
When would you want to make four at a time half square triangles?
Making four at a time half-square triangles (HSTs) can be a more efficient and time-saving method compared to traditional methods, especially when you need a larger quantity of identical or symmetrical HSTs. Here are some situations where making four at a time HSTs might be advantageous:

Efficiency:
Producing four HSTs at once reduces the number of individual stitching and cutting steps, making the process more time-efficient.
Consistency:
When making multiple HSTs for a quilt or block, the four-at-a-time method ensures that all units are identical in size and shape, contributing to a more uniform appearance in the final project.
Reduced Fabric Waste:
The method minimizes fabric waste since you’re working with larger initial squares, and there’s less trimming involved compared to making HSTs individually.
Batch Processing:
If you’re creating a quilt with a repetitive pattern that involves a significant number of HSTs, making them four at a time allows you to batch process and streamline your workflow.
Quilts with Lots of HSTs:
Quilt blocks and patterns that heavily rely on HSTs, such as pinwheels, stars, or checkerboard designs, benefit from the efficiency of making four at a time.
Conserving Fabric:
The method can be advantageous when you want to conserve fabric by minimizing the amount needed for seam allowances and reducing the likelihood of errors in cutting or piecing.
Improving Accuracy:
For some quilters, the four-at-a-time method can result in more accurate HSTs because the units are sewn together and cut simultaneously, reducing the potential for distortion.
How to Master the Four-at-a-Time Half Square Triangle Technique!
Making four half-square triangles (HSTs) at a time can be an efficient way to produce multiple units simultaneously. And by following a few easy steps you’ll soon master this technique! Here’s an easy step-by-step guide:
Materials Needed:
Two squares of fabric in different colors or prints. I recommend using contrasting fabric to produce the HSTs that will “pop”!
Rotary cutter and cutting mat or fabric scissors.
Quilter’s ruler.
Sewing machine.
Iron and ironing board.
Step 1: Cutting Squares
Decide on the size you need your HSTs to be, or follow the recommended size on the pattern you’re making.

To determine the size of square to start with take the measurement of the HST you need and divide that number by .64, then add .25 and round up to the nearest 1/4 inch.
For example, if you need a 3.5 inch HST take 3.5 / .64 = 5.47 + .25 = 5.72 and round it to 5.75 or 5 3/4 starting square size.
Here is a quick chart for some popular HST sizes.

Step 2: Layering Squares
Place the two fabric squares right sides together, matching raw edges.

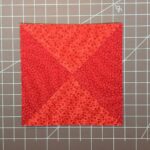
Step 3: Sewing Around the Edges
Sew a scant 1/4 inch all around the four edges of the squares.

Step 4: Cutting the HST Apart
Using a rotary cutter and a quilting ruler make two diagonal cuts from corner to corner.

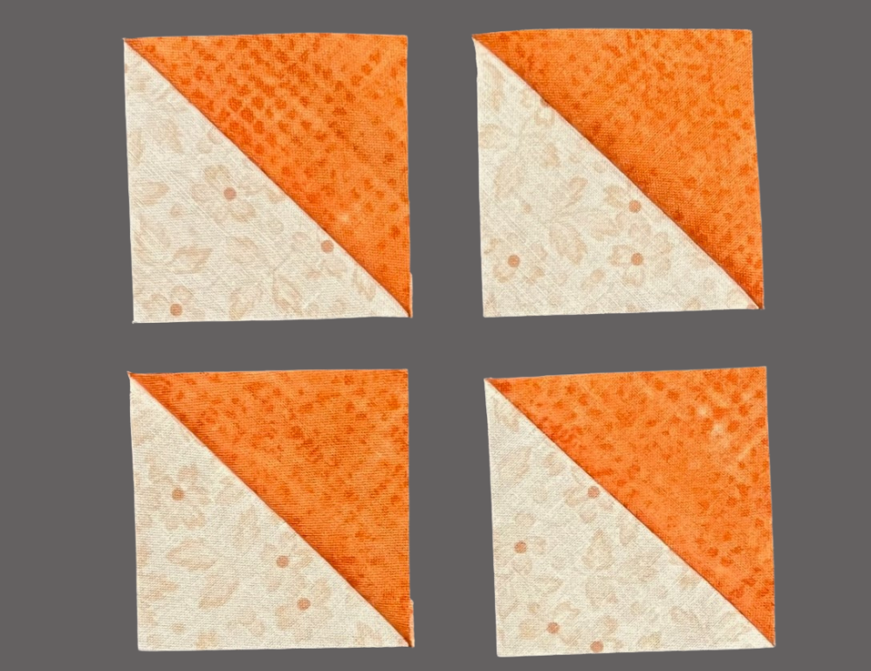
Step 5: Pressing the HST Open
Press the units open to set the seams.

Here are some helpful tips for pressing your HSTs!
The method for pressing half-square triangle (HST) units can depend on personal preference and the specific quilt block or pattern you’re working on. However, there are some general tips and considerations to help you achieve accurate and flat HSTs:
Pressing Seams Open vs. to One Side:
Some quilters prefer to press the seams open to reduce bulk, especially when working with multiple seams in intricate blocks. Others press the seams to one side, usually toward the darker fabric, to create a nesting effect and improve block stability.
Experiment with both methods to see which one you find more comfortable and which works better for the specific project you’re working on.
Setting Seams:
Before pressing the HSTs open or to one side, start by setting the seam. This involves pressing the seam as it was sewn without opening it. It helps the fibers of the fabric settle and creates a cleaner, more precise seam.
Finger-Pressing or Using a Clapper:
After setting the seam, you can use your fingers to gently press the seam open or to the side before using an iron. Some quilters also use a wooden clapper to set the seam and flatten it further.
Avoiding Distortion:
Be cautious not to stretch or distort the HST units when pressing. Handle them gently to maintain their shape.
Consistent Direction:
If you’re making multiple HSTs for a quilt block, press the seams in a consistent direction. This will make it easier to match seams when assembling the blocks.
Pressing Mat or Board:
Consider using a pressing mat or board underneath your work to provide a firm surface, which can help in achieving crisp, flat seams.
Starch or Sizing:
Some quilters like to use starch or sizing to give the fabric more body and stability, making it easier to handle and press accurately.
Final Pressing:
After assembling the quilt block or unit, give it a final press to set the seams and create a flat, polished appearance.
Ultimately, the best method for pressing HSTs is the one that works best for you and the specific needs of your project. As you gain experience, you may develop a preference for certain pressing techniques based on your quilting style and the characteristics of the fabrics you’re working with.
Step 6: Trimming the HST to Accurate Size
Trim each unit down to the desired size. Align your ruler with the finished size measurement and trim the excess fabric.

Tips:
Accuracy is crucial, especially when trimming. Take your time to ensure precise measurements.
Pressing is essential at each step to ensure flat and neat HSTs.
Experiment with different color combinations for visually interesting quilt blocks.
This method allows you to make four HSTs at once, which can save time and improve the efficiency of your quilting or sewing projects. Adjust the square size according to your project requirements.
Quilt Blocks that Use Half Square Triangle Units
Half-square triangles (HSTs) are incredibly versatile and are used in numerous quilt blocks. Here are some popular quilt blocks that incorporate HSTs:
Ohio Star:
A classic block featuring a central square surrounded by HSTs, creating a star-like design.

Pinwheel:
HSTs arranged to create a pinwheel effect, resulting in a whimsical and playful design.

Flying Geese:
HSTs are often used to create the triangles in a flying geese block, where three triangles form a rectangle unit.

Square in a Square:
A central square surrounded by HSTs to form a larger square, creating a classic and clean design.

Hourglass:
Two pairs of HSTs combined to create an hourglass shape, a simple yet elegant block.

Broken Dishes:
HSTs arranged in a pattern resembling shattered or broken dishes.

Churn Dash:
Combining HSTs with other shapes to form a traditional block known for its distinctive “churn dash” pattern.

Star Blocks:
Various star blocks, such as Friendship Star or Missouri Star, often incorporate HSTs to form the star points.

Bear’s Paw:
HSTs and other shapes arranged to resemble a bear’s paw, creating a charming and traditional design.

These are just a few examples, and there are countless other quilt blocks that use half-square triangles as a fundamental building block. Experimenting with color placement and block layout can lead to unique and personalized quilt designs.
I hope you have fun using the four-at-a-time half square triangle method to make your favorite quilt blocks!
I’ve make a thorough video tutorial to walk you through the process of making four-at-a-time HSTs!
Click here to view the video tutorial for how to make 4-at-a-time HST units!
I’ve also writing a post on Easy Two at a Time Half Square Triangles for you to check out!
My Carnival Quilt Pattern my Friendship Wreath Quilt Pattern and my Baldwin Creek Quilt Pattern use lots of HSTs that you can use the four-at-a-time HSTs technique with!!


Happy Quilting!!