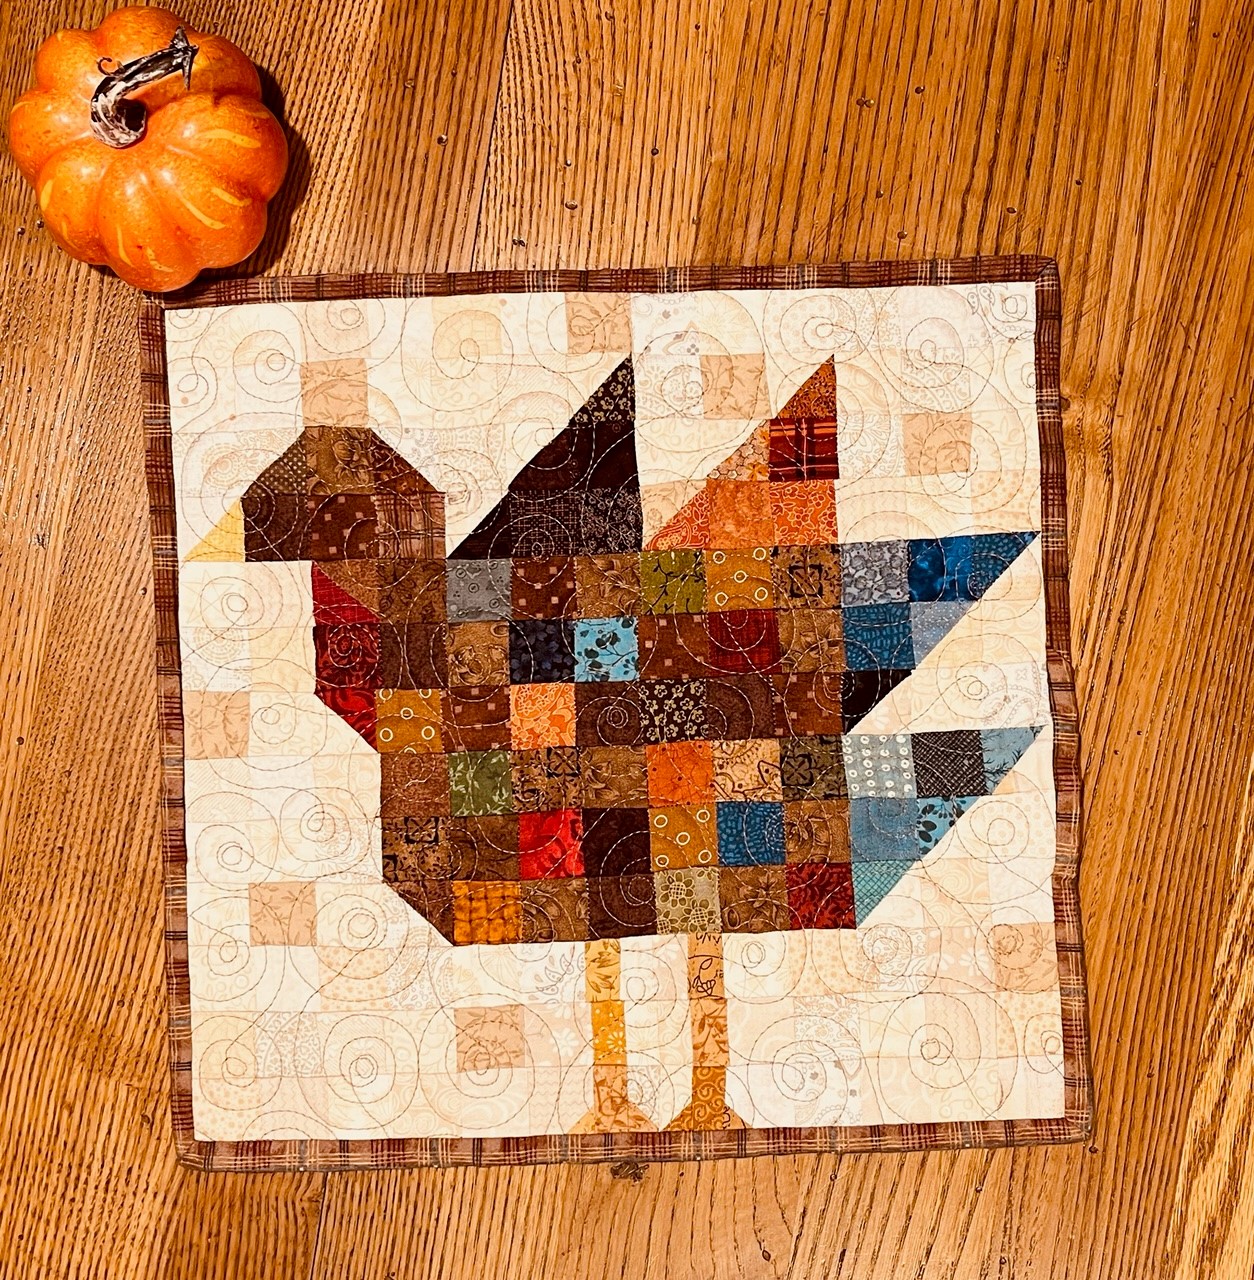
This scrappy, mini Tom Turkey quilt pattern is an easy pattern for a beginning quilter. Measuring just 13” x 13”, this quilt is the perfect size to decorate a shelf or table. Or add a sleeve to the back of the cozy little quilt, and hang this turkey up!!
There’s nothing complicated about the pattern. This quilt can easily be over the weekend!! Using such small squares, you can either purchase small amounts of fabric or just use scraps to create this fun project!
Thanksgiving is a special holiday for me, and this little quilt evokes memories of family around the Thanksgiving table, the smell of all the wonderful food, and the thankfulness I have in my heart!
Post contains affiliate links and we earn commissions if you shop through the links on this page, including Amazon Associate links. For more information please read the disclaimer on the Privacy Policy page.
You can purchase an ad-free digital PDF of the Tom Turkey quilt pattern in my Etsy shop!!
General Sewing Directions for the Tom Turkey Quilt Pattern
The directions for this Tom Turkey quilt pattern are for rotary cutting, machine piecing, machine quilting, and the binding is hand-stitched to the quilt back.
Accurate cutting and sewing enhances your final product. Pin your pieces together before sewing them to ensure proper seam alignment.
Use a 1/4″ seam allowance. I recommend using a special presser foot with a 1/4″ guide if you have one for your machine. This will help you get uniform seams, and matching corners!
Follow the directions described below as you press open the seams. Each individual row is pressed in the opposite direction of the previous row to eliminate bulk and help seams to lay flat. Rows sewn together are then all pressed in one direction for a uniform look.
The pattern calls for machine quilting, but this quilt is so small you could easily hand quilt it!
The finished quilt measures 13” x 13”.
Fabric Requirements for the Tom Turkey Quilt Pattern
The Tom Turkey quilt pattern is made using a variety of brown, red, purple, orange, blue, teal, green, and yellow prints. For the background I used a variety of buttery cream fabrics to show off this tom. Have fun choosing your color palette, and remember…there are no rules!!
I get inspiration for my color choices from the fall colors in northern Wisconsin!

All Fabrics: The variety of colored fabrics all require less than 1/4 yard. To achieve the scrappy look use a variety of 8-10 different prints for each color. Either raid your stash or scrap bins, or purchase a few new fat quarters. You’ll need at least a 1 1/2″ wide strip of any one fabric.
Backing Fabric: 1 fat quarter
Binding Fabric: 1/6 yard total
Batting: You’ll need a piece of 17” x 17” thin cotton batting.
Cutting Directions for the Tom Turkey Quilt Pattern
Use your favorite rotary cutter, a plastic quilting ruler, and a self-healing cutting mat to create the necessary patches to make this easy Tom Turkey quilt pattern.
Brown Fabric:
Cut 33 – 1 1/2″ squares
Red Fabric:
Cut 6 – 1 1/2″ squares
Purple Fabric:
Cut 8 – 1 1/2″ squares
Orange Fabric:
Cut 9 – 1 1/2″ red squares
Blue Fabric:
Cut 8 – 1 1/2″ squares
Teal Fabric:
Cut 8 – 1 1/2″ squares
Green Fabric:
Cut 4 – 1 1/2″ squares
Yellow Fabric:
Cut 9 – 1 1/2″ square and Cut 2 – 1” squares
Cream Background:
Cut 110 – 1 1/2″ squares. Again, use a variety of at least 8-10 different prints from your stash or fun new fat quarters.
Binding:
I used a brown plaid print for my binding. In total, you’ll need a binding strip that ends up measuring about 60” long (this leaves room for connecting the ends). Cut either 2 – 2 1/2″ x 44” strips, or cut 4 – 2 1/2″ x 22” strips.
Backing:
Cut a 17” x 17” square
Batting:
Cut a 17″ x 17″ square
Half Square Triangle Blocks
You’ll make some half square triangle (HST) blocks for the turkey’s beak, feathers, wattle, and feet. You’ll need the following:
Brown/Cream: 3
Purple/Cream: 3
Orange/Cream: 3
Blue/Cream: 3
Teal/Cream: 3
Yellow/Cream: 3
Red/Cream: 1
Red/Brown: 1
Using a fine pencil, lightly draw a diagonal line on the wrong side of the cream or lighter-colored square.
Now, place the right side of a colored or darker-colored square and the right side of a cream or lighter-colored square (the one you just drew the line on!) together.
With the diagonal line facing you (wrong side up!), sew along the line.
Trim 1/4″ from seam. Press seam toward the darker side.
This half square triangle block should again measure to be a 1 1/2″ square. Trim if needed.


Unique Blocks
You’ll make a few unique blocks to form the legs and the feet.
For the legs you’ll use 4 cream squares and 4 yellow squares.
On the wrong side draw a line down the center of the cream squares.
Sew each of the cream squares to the yellow squares along the drawn line.
Trim 1/4″ from seam and press seam toward yellow side.


For the one side of the feet use 2 of the yellow/cream HST you already made and two more yellow squares.
Draw a line down the center of the yellow squares.
Sew the yellow square to the yellow/cream HST, with each of the HST blocks facing in the opposite direction when you open the block.
Trim 1/4″ from seam and press seam toward yellow side.


For the other side of the feet you’ll use 2 cream squares and 2 – 1” yellow squares.
Draw a diagonal on the wrong side of the yellow squares.
Right sides together, place a yellow square on the opposite bottom corners of the cream squares and sew along the diagonal lines.
Trim 1/4″ from seams and press toward cream sides.


Assemble the Quilt Top
Now that you have all your 1 1/2″ squares cut out and your half square triangle and your unique blocks ready, you want to plan how they’ll be arranged to make up the quilt top.
I like to lay all my squares on a card table next to my sewing machine and play with arranging them until I get the look I want. Follow the diagram shown here to obtain the design.
The layout will be 13 squares across and 13 squares down.

Begin stitching squares together (right sides facing) to complete each row across.
Remember to use a 1/4″ seam allowance for all seams. I really like to use my 1/4″ seam foot to make sure all my seams are exactly 1/4″!!
This is especially important when sewing such tiny squares together.
If you don’t have this type of foot, make sure you know exactly where your 1/4″ sewing line is on your machine, and be careful to follow it!
As you complete a row, lay it back down on the table in the correct placement.
Pressing the Rows and Sewing Them Together
I wait to press the rows until I have each of them sewn together. Be careful to just “press” and NOT “iron” the seams in a back-and-forth motion, or your quilt top will stretch out of shape.
Begin by pressing the seams of the first row all in one direction.
Press the seams of the second row in the opposite direction. Continue to rotate the pressing direction of each row until you have the seams of all rows pressed.
Think…odd rows 1, 3, 5, etc. press the seams to the right. Even rows 2, 4, 6, etc. press the seams to the left.
By using this rotating direction of pressed seams, you will have nicely nested seams and less bulk when you sew the rows to each other.
This method of pressing distributes the bulk, which will make you happy when you machine quilt your project! Bulky seams can lead to bumpy quilting patterns, broken thread, and overall unevenness of your machine-quilted quilt top.

Now that you have the pieced rows pressed, sew them together!
Pin row 1 (this can either be the top row or the bottom row) and row 2 together, right sides together. Make sure to line up the seams so they nest together, and pin directly on the seams perpendicular to the edge (rather than parallel) to hold them in place.
Remove the pins as you come to them when you’re stitching the 1/4″ seam.
I like to press each set of rows as I sew them together. The rows all get pressed in one direction, either towards the top or towards the bottom.
By pressing them all in one direction it will make for a uniform and smooth quilt top. Repeat until you have all of the rows sewn to each other and pressed.
Finishing the Quilt
Now that you have your quilt top sewn together, it’s time to finish it!
Layering the Top, Batting, and Back
I refer to layering the quilt as “sandwiching”. You need to sandwich the top and back with the batting in the middle.
For a larger quilt, this process takes a bit more time and steps. But for this mini quilt, it’s a breeze to sandwich the layers together!
Step 1
On a table or countertop, use masking or painter’s tape to tape down the backing fabric. As you tape the back to the table, you’ll want to make sure the fabric is smooth, without wrinkles. Also, make sure the right side of the fabric is facing down!
Step 2
Lay the batting on top of the taped-down quilt back, and move your hands across it to smooth it all over. This will get rid of any wrinkles in the batting, and help to adhere it to the backing fabric. This quilt is so small, you don’t need to use basting spray to adhere the layers together. Just a few pins will do the trick!
Step 3
Once you have the batting placed on top of the quilt back, center the top of the quilt (the flimsy!) over the two bottom layers. Right side facing up, of course! The two bottom layers of the quilt (the back and the batting) should extend about 2” all around the outside edges of the quilt top.
Step 4
Move your hands across the quilt top to smooth it all over, and help remove any wrinkles. This will also help adhere the quilt top to the batting a little bit. Once you have the top of the quilt all smoothed out, use large safety pins to baste all three layers together. I like to use 1 1/2″ stainless pins, and I keep them all in a cute old canning jar that was my grandma’s.
Step 5
Put a pin in each corner of the quilt sandwich, in the middle, and around the quilt so the three layers don’t move around when you’re machine quilting this project. I used about 8-10 pins to hold the sandwich together. You really don’t want to use more than this or you’ll be needing to stop a lot when you’re quilting to remove pins, which upsets the mojo of your quilting rhythm, lol!
“Quilting” the Quilt
I used a cute meandering swirl to machine quilt my layers together. It reminds me of the autumn breeze blowing leaves!

Use whatever free-motion stitch you’d like, or use a straight stitch to quilt in the ditches or along the seams.
You’ll need a darning foot to free-motion quilt, and you’ll need to either be able to lower the feed dogs on the machine or place a special cover over them.
If you’re using a straight stitch to machine quilt you’ll need a walking foot.
As an alternative, you can hand-quilt these layers together too.
Binding the Quilt
When you’ve finished quilting the layers together, it’s time to bind them!
Prepare the Binding
Fold each of the cut binding strips in half end to end. Use the 45° line on your plastic ruler to trim the ends at a 45° angle.
When you open the strips the angles on the ends will be facing in opposite directions.
Place the ends of two strips perpendicular, right sides together, and sew 1/4″ seam.
Repeat to join all strips into one long binding strip. Press seams open, then press long strip in half lengthwise, right sides facing out.
Sew the Binding Strip to the Quilt
Begin to sew the raw edge of the binding to the quilt by pinning it along one side. Be careful to sew the raw edge of the binding strip to the quilt, not the folded edge!
For a quilt this size I usually start sewing the binding strip about 2” from the first corner I’ll miter. Start sewing about 8” in from the end of the binding strip, leaving a hanging tail #1 on the binding. You’ll sew this to the other end of the binding strip (tail #2) when you finish sewing all along the sides of the quilt.
Stop sewing on the first side 1/4″ from the corner, use a pin to mark this location and sew right up to it. Backstitch a bit, and cut your thread but DON’T cut the binding strip.
Making the Mitered Corner
Now, remove the quilt and binding strip from your machine and fold the binding strip straight up so it’s perpendicular from the side you were just sewing on.
Fold the binding strip back down on itself and match it to the edge of the quilt you just sewed it to, and the next edge of the quilt you’re about to sew it to. Pin this fold in place, and pin the binding strip to this edge of the quilt and continue to sew it, again stopping 1/4″ from the next corner and repeating the folding process described above.
Continue in this manner until you are on the last side of the quilt, the side you started on.
Connecting the Ends of the Binding
Stop stitching about 9” from where you started. Backstitch and cut the thread (but not the binding strip, not yet!), remove the quilt and binding strip from the machine.
You now have two “tails” of the binding strip, tail #1 from where you started stitching it to the quilt and tail #2 from where you ended. You’ll need to join these tails together so that you have a continuous binding strip to finish sewing down to the quilt. Follow the steps below to join the tails!
STEP 1
Lay tail #1 of the binding strip along the unsewn edge of the quilt. Trim it at a 90° angle about half way between this unsewn edge.
STEP 2
Lay tail #2 of the binding strip over tail #1 along the unsewn edge of the quilt. Measure 2 1/2″ beyond the trimmed straight edge of tail #1. Mark this 2 1/2″ measurement with a pin or pencil, and trim the tail #2 at a 90° angle also. The two trimmed binding strip tails should overlap by 2 1/2″.
STEP 3
Unfold the two tails so they lay flat. Pin the two tails together perpendicular to each other (right sides together). Use a fine pencil to draw a diagonal line from the corner of tail #2 to the opposite side, as shown here.
Sew along the drawn diagonal line. Fold binding strip in half again. The continuous binding strip should now lay flat along the unsewn edge of the quilt. If necessary, shorten or lengthen the continuous strip before trimming it. Then trim the outside corner 1/4″ from the seam and finger press the seam open. Fold it in half again and finish sewing the binding strip to the quilt.
Trim the Batting and Back
Trim the batting and quilt back to 1/4″ from the edge of the quilt top. I use a ruler and a rotary cutter to accomplish this task. Work carefully, so you don’t cut into your quilted project.
Hand-Stitch the Folded Binding Edge to the Quilt Back
Here is my FAVORITE part of the process, hand-stitch the folded edge of the binding strip to the back of the quilt. When you get to the corner, carefully turn the corner right-side out to make a nice, mitered corner. I tack a few stitches up the corner to hold it in place, and then continue stitching along all sides and corners until…VOILA! Your binding is complete!
If you’d like, you can add a label to the back of your quilt.
I hope you enjoy making this scrappy, mini Tom Turkey quilt!!
Happy Quilting!!!
Get more cute fall quilt patterns!! Make the Majestic Maple or the Pumpkin Patch mini quilts too!!!


