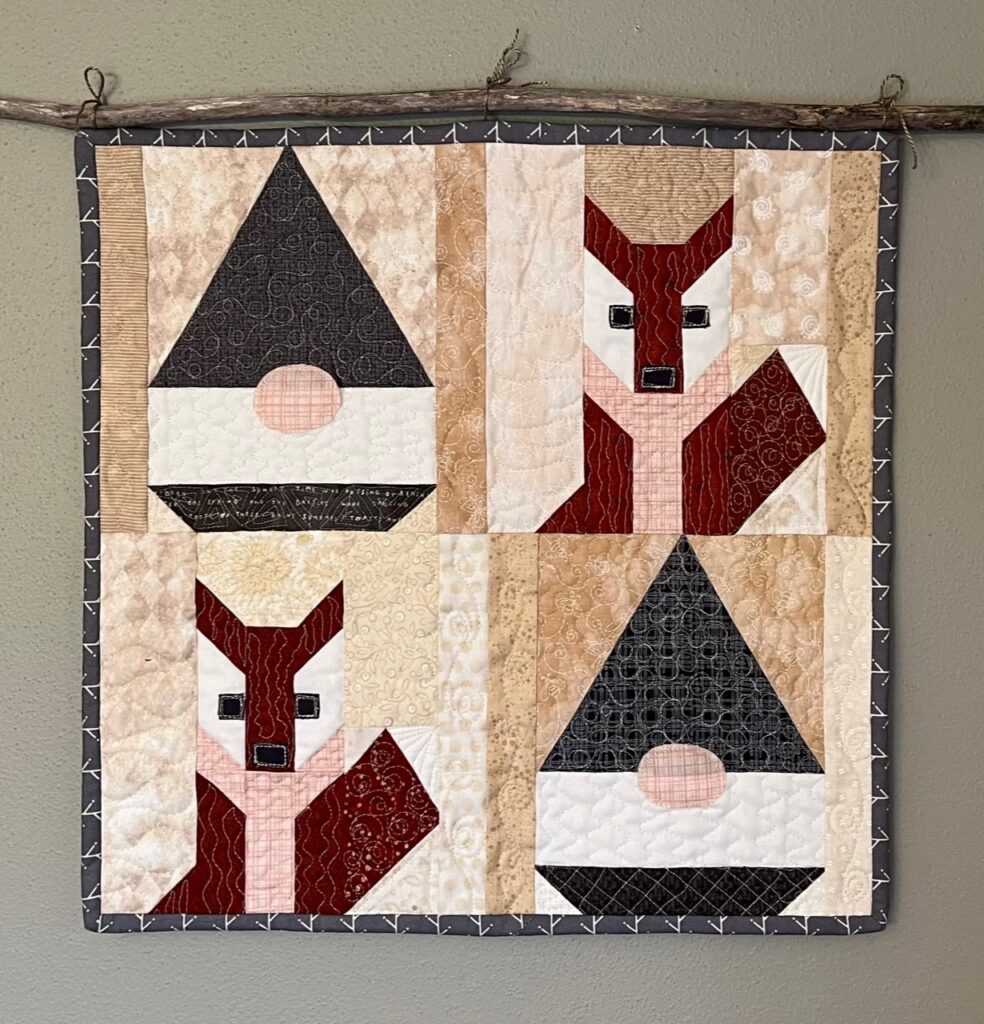
These Foxy Gnomes Quilt and Pillow patterns are easy so that even a beginning quilter can make them with confidence!
Measuring 16” x 16”, the whimsical Foxy Gnomes Quilt is the perfect size to decorate a table! Or add a sleeve or string ties and hang these Foxy Gnomes up!!
If you just add a border, you can turn this quilt into a fun, 18” x 18” Foxy Gnomes Pillow!!
There’s nothing too complicated about the pattern. This quilt can easily be made in a day or over the weekend!!
Because the top includes small pieces you can either purchase a few fat quarters or just use scraps of fabric to create this cutie!
Fabric and Material Requirements
I used a variety of rust and gray colored prints for the Foxy Gnomes Quilt. I also used a dark cream print for all the background. But there are no rules!! Use any color you love or a variety of your favorite colors!!
If you’re looking for fabric, check out the Fat Quarter Shop or Connecting Threads! These online fabric shops make fabric buying easy right from home!!!
Rust:
The total fabric needed is about 1/4 yard. However, to achieve the scrappy look of this quilt I suggest using a few different prints. Either raid your stash, or purchase a few new fat quarters!
Gray:
Again, the total fabric needed is about 1/4 yard. I recommend using a few different prints!
White:
1/8 yard
Peach:
1/8 yard
Cream:
1/2 yard total, you can use a few different prints if you’d like more of a scrappy look
Dark Gray or Black (for eyes and fox nose):
2” x 2” piece
Fabric for Backing:
5/8 yard
Binding Fabric:
1/4 yard
Batting:
You’ll need a piece of 20″ x 20″ thin cotton batting (like Warm & Natural)
Fusible Web (like Wonder-Under):
You’ll need a 5” x 5” piece
Cutting Directions
Rust:
Cut 2 – 4 1/4” x 2 1/2” strips; 10 – 1 1/2” x 1 1/2” squares; and 6 – 3 1/2” x 1 1/2” strips
Gray:
Cut 2 – 6 1/2” x 1 1/2” strips and 2 triangles from Template A
White:
Cut 2 – 6 1/2” x 2 1/2” strips; 4 – 3 1/2” x 1 1/2” strips; and 2 – 2 1/2” x 1 1/2” strips
Peach:
Cut 2 – 3 1/2” x 1 1/2” strips; 8 – 1 1/2” x 1 1/2” squares; and 1 – 3” x 3” square. Iron the 3” x 3” piece onto the fusible web according to directions on the fusible web packaging. Peel the paper backing off the fusible web and then cut 2 noses from Template D.
Dark Gray or Black:
Iron the 2” x 2” piece onto the fusible web according to directions on the fusible web packaging. Peel the paper backing off the fusible web and then cut 4 – 1/2” x 1/2” squares for the eyes and 2 – 1/2” x 3/4” rectangles for the noses.
Cream:
Cut 6 – 1 1/2” x 1 1/2” squares; cut 2 – 2 1/2” x 2 1/2” squares; 2 – 3 1/2” x 2 1/2” strips; cut 2 – 4 1/2” x 2 1/2” strips; 2 – 8 1/2” x 2 1/2” strips; and 6 – 8 1/2” x 1 1/2” strips
*If making the Foxy Gnomes Pillow also cut 2 – 16 1/2” x 1 1/2” strips and 2 – 18 1/2” x 1 1/2” strips
Quilt Back:
Cut 1 – 20″ x 20″ square
*If making the Foxy Gnomes Pillow cut a 22″ x 22″ square
Binding:
Cut 2 – 2 ½” x 44” strips
*If making the Foxy Gnomes Pillow you do not need to cut Binding strips
Batting:
Cut 1 – 20″ x 20″ square
*If making the Foxy Gnomes Pillow cut a 22″ x 22″ square
General Sewing Directions
The directions for this pattern are for rotary cutting, machine piecing, machine quilting, and the binding is hand-stitched to the quilt back.
Accurate cutting and sewing enhances your final product. Pin your pieces together before sewing them to ensure proper seam alignment.
Use a ¼” seam allowance. I recommend using a special presser foot with a ¼” guide if you have one for your machine. This will help you get uniform seams, and matching corners!
Follow the directions described below as you press open the seams to eliminate bulk and help seams to lay flat.
Sew the Fox Blocks
You’ll sew the fox together in sections.
There is a Foot Section, a Main Body Section, and a Tail Section. Below are the directions for sewing each of these sections.
Take your time and follow the directions and illustrations to complete this block.
To prepare, draw a diagonal line (using a washable fabric pen and a straight-edge) from one corner to the opposite corner on the back side of 5 – 1 1/2” x 1 1/2” rust squares; 4 – 1 1/2” x 1 1/2” peach squares; 1 – 1 1/2” x 1 1/2” cream square; and 1 – 2 1/2” x 2 1/2” cream square.

Foot Section:
Attach a 1 1/2” rust square on the bottom right corner of an 8 1/2” x 2 1/2” cream strip along the 2 1/2” side by sewing along the diagonal line. Trim 1/4” from seam, removing the outside corner. Flip the corner open and press seam toward the rust fabric. This completes the Foot Section!

Main Body Section:
The Main Body Section is created in sections also! You’ll need to sew the Ears Section, Face Section, and Tummy Section then sew each of these sections together to create the Main Body Section.
Ears Section:
Attach a 1 1/2” rust square on each bottom corner of the 3 1/2” x 2 1/2” cream strip, along the 3 1/2” side with the diagonal lines facing opposite each other and running parallel to the corner.
Sew along the diagonal line of each rust square. Trim 1/4” from seam, removing each outside corner. Flip the corners open and press seams toward the rust fabric.

Face Section:
Sew a 1 1/2” x 1 1/2” rust square along the diagonal line to corners of 2 – 3 1/2” x 1 1/2” white strips, with diagonal lines facing opposite directions, attaching it to the 1 1/2” side.
Trim 1/4” from seams removing the outside corners. Flip the corners open and press each toward the rust fabric.


Next, sew a peach square (again sewing along the drawn line) onto the opposite bottom corners of these two white/rust strips. Trim each outside corner 1/4” from seam and press seam toward peach fabrics.

Sew these rust/white/peach 3 1/2” x 1 1/2” strips to each side of a 3 1/2” x 1 1/2” rust strip, sewing along the 3 1/2” side. Press seams toward the rust fabric.

Tummy Section:
Sew a 1 1/2” peach square along the diagonal line to opposite top corners of 2 – 3 1/2” x 1 1/2” rust strips, attaching it to the 1 1/2” side.
Trim 1/4” from seams removing the outside corners. Flip the corners open and press each toward the rust fabric.

Sew these peach/rust 3 1/2” x 1 1/2” strips to each side of a 3 1/2” x 1 1/2” peach strip, sewing along the 3 1/2” side. Press seams toward the peach/rust outside strips.

Sew the bottom of the Ears Section to the top of the Face Section. Press seam toward Face Section. Then, sew the bottom of the Face Section to the top of the Tummy Section. Press seam toward Tummy Section. This completes the Main Body Section!

Tail Section:
Draw a diagonal line on the back side of the 1 1/2” x 2 1/2” white strip, drawing it from the upper right corner of the 2 1/2” side down to the lower left opposite corner.
Tip of Tail
Next, take the 4 1/2” x 2 1/2” rust strip and measure over 1 1/2” from the top right of the 2 1/2” side marking it with a pin. Also measure down 2 1/2” from the top right along the 4 1/2” side marking it with a pin.
Align the white strip so the corners with the drawn lines on them match up to the measured markings, with the upper corner or the white strip aligning to the upper 1 1/2” pinned location and the lower corner of the white strip aligning to the right 2 1/2” pinned location.
The white strip is now laying diagonal to the rust strip and looks a bit wonky.
Sew the two strips together along the diagonal line.
Trim 1/4” from the seam removing the outside corner. Flip the corner open and press toward the white fabric and now the white tip of the tail aligns perfectly with the rust strip!

Background on Tail Section
Sew along the diagonal line to attach the 1 1/2” x 1 1/2” cream square onto the top left corner of the rust/white unit. Trim 1/4” from seam removing the outside corner. Press seam toward the cream fabric.
Follow these same directions to sew the 2 1/2” cream square onto the lower right, opposite corner of the unit.
Sew the 4 1/2” x 2 1/2” cream strip to the top side of the tail unit to create a 2 1/2” x 8 1/2” unit. Press seam toward cream fabric. Sew 1 – 8 1/2” x 1 1/2” cream strip to the right, long side of the unit. This completes the Tail Section!

Finish the Fox Block
Sew the long, right side of the Foot Section to long, left side of the Main Body Section. Press seam toward Foot Section.
Sew the long, left side Tail Section to the long, right side of the Main Body Section. Press seam toward the Tail Section.
Place and iron the two dark gray eyes and a nose onto the face according to directions on the fusible web. Carefully stitch ⅛” or so around the edge of the eyes and nose, 2-3 times around.
Use a wider length of stitch than normally used. It’s ok if the stitching overlaps and looks a little messy, that adds to the charm of this fox!!
This completes the Fox Block!

Unfinished block should measure 8 1/2” x 8 1/2”, trim if needed. Repeat each step to make a second Fox Block!
Sew the Gnome Blocks
To prepare, draw a diagonal line (using a washable fabric pen and a straight-edge) from one corner to the opposite corner on the back side of 2 – 1 1/2” x 1 1/2” cream squares.
Sew the Bottom of the Gnome Body
Attach a 1 1/2” cream square on each of the bottom corners of a 6 1/2” x 1 1/2” gray strip along the 6 1/2” side with diagonal lines facing in opposite directions. Sew along the diagonal lines.
Trim 1/4” from seams, removing the outside corners. Flip the corners open and press seams toward the gray fabric.

Sew Gnome Hat
To make the gnome hat sew a cream triangle from Template B to the left side of the gray gnome triangle that was cut from Template A. Press seam toward cream triangle.
Sew a cream from Template C to the right side of the gray/cream unit. Press seam toward cream triangle.
Sew the gnome hat to the 6 1/2” x 2 1/2” white strip, along the 6 1/2” sides. Press seam toward gray fabric.
Then sew on the gray/cream body unit to the bottom of the white strip. Make sure to align the long gray side of the body unit to the white beard. Press toward gray fabric.

Finish Gnome Block
Place the peach oval nose cut from Template D on the face of the gnome. I like the nose to be mostly on the white with a little sticking above onto the gray hat.
Press to set nose in place via directions for the fusible web. Carefully stitch ⅛” or so around the edge of the nose, 2-3 times around. Use a wider length of stitch than normally used.
It’s ok if the stitching overlaps and looks a little messy, that adds to the charm of this gnome block and makes each one unique!
Sew an 8 1/2” x 1 1/2” cream strip to each side of the gnome to finish the block. Press toward cream fabric.

Unfinished block should measure 8 1/2” x 8 1/2”, trim if needed.
Repeat all directions to make a second Gnome Block!
Assemble the Quilt Top
Now that you have the two Fox Blocks and the two Gnome Blocks sewn together, you’re ready to assemble the quilt.
Lay out the blocks like the diagram here.

Sew the top gnome to the top fox, press the seam to the right.
Then sew the bottom fox to the bottom gnome, press the seam to the left. Now sew the top row to the bottom row, press the seam toward the bottom row.

*If you’re making the Foxy Gnomes Pillow, sew a 16 1/2” x 1 1/2” cream strip to the right and left sides, press seams toward cream strips.
Then sew an 18 1/2” x 1 1/2” cream strip to the top and bottom sides, press seam toward cream strips.
Layering the Top, Batting, and Back
Now that you have your quilt top sewn together, it’s time to finish it!
I refer to layering the quilt as “sandwiching”. You need to sandwich the top and back with the batting in the middle.
Tape the Backing Down
On a hard surface floor, or with two large tables pushed together, use painter’s tape to tape down the backing fabric.
As you tape the back down you’ll want to make sure the fabric is smooth, without wrinkles. Also, make sure the right side of the fabric is facing down!
Add the Batting
Lay the batting on top of the taped-down quilt back, and move your hands across it to smooth it all over. This will get rid of any wrinkles in the batting, and help to adhere it to the backing fabric.
Place the Quilt Top
Once you have the batting placed on top of the quilt back, center the quilt top over the two bottom layers. Right side facing up, of course!
The two bottom layers of the quilt (the back and the batting) should extend about 2” all around the outside edges of the quilt top.
Move your hands across the quilt top to smooth it all over, and help remove any wrinkles. This will also help adhere the quilt top to the batting a little bit.
Baste the Layers
You can either spray baste your quilt layers or pin them together with 1 ½” stainless pins.
Place pins around the entire quilt every 4-5 inches so the three layers don’t move around when you’re machine quilting this project.
Again, make sure all wrinkles are smoothed out. Adjust basting if needed to remove any wrinkles.
“Quilting” the Quilt
Use whatever free-motion stitch you’d like, or use a straight stitch to quilt in the ditches or along the seams.
Here is a quick video on how to create a swirly cinnamon bun quilting design!
You’ll need a darning foot to free-motion quilt, and you’ll need to either be able to lower the feed dogs on the machine or place a special cover over them.
If you’re using a straight stitch to machine quilt you’ll need a walking foot.
I used a variety of designs to machine quilt my layers together. I avoided quilting over the noses!

Sewing the Pillow Form Insert
Here is a quick video on how to sew a pillow form!
Place the 2 – 18 ½” squares of muslin together, pin, and stitch around the edges ¼” removing pins as you come up to them. Leave a 5” opening on one side.
Trim the corners ⅛” and turn right side out.
Stuff with about 1 pound of Poly-fil.
Turn the opening under and pin edges together. Sew the opening shut using about a ⅛” seam allowance, remove pins as you come to them.


Plump pillow insert to remove lumps. Easy peasy!

Sewing the Quilted Pillow Cover
Once you’ve quilted the pillow top, sew the back pieces on to make it into an envelope pillow cover.
For each of the 2 – 12 ½” x 18 ½” units, fold one right side of the 18 ½” side under ¼” and press.
Fold under again ¼”, press, and stitch along the inside of the folded side to create a ¼” hem.
Place the “unhemmed” side of each of these two units along the opposite edges of the quilt top, right sides together with the right side of the quilt top, so that the hemmed edges of the backing units overlap each other in the center.
Pin in place all around each edge and stitch ¼” around all of the outside edges to sew the backing in place, removing pins as you sew up to them.
Trim corners about ⅛” and turn right side out. Carefully use the blunt end of a wooden skewer or the end of a small paintbrush to push the corners right side out.
Stuff the quilted pillow cover with the 18” pillow form insert.


Binding the Quilt
When you’ve finished quilting the layers together, it’s time to bind the edges of your quilt! You can use one color or several colors to make the binding!
*If you’re making the pillow you will not bind it!
Prepare the Binding
Making the binding isn’t hard, but there are a few steps that need to be followed. Here is a video on making a binding that you can view to help you with the process!
Fold each of the cut binding strips in half end to end. Use the 45° line on your plastic ruler to trim the ends at a 45° angle.
When you open the strips the angles on the ends will be facing in opposite directions.
Place the ends of two strips perpendicular, right sides together, and sew ¼” seam.
Repeat to join all strips into one long binding strip. Press seams open, then press long strip in half lengthwise, right side facing out.
Sew the Binding Strip to the Quilt
Begin to sew the raw edge of the binding to the quilt by pinning it along one side. Be careful to sew the raw edge of the binding strip to the quilt, not the folded edge!
I usually start sewing the binding strip in the middle of the quilt side that I’m starting with. Start sewing about 8” in from the end of the binding strip, leaving a hanging “tail” on the binding. You’ll sew this to the other end of the binding strip when you finish sewing all along the sides of the quilt.
Stop sewing on the first side ¼” from the corner, use a pin to mark this location and sew right up to it. Backstitch a bit and cut your thread but DON’T cut the binding strip.
Making the Mitered Corner
Now, remove the quilt and binding strip from your machine and fold the binding strip straight up so it’s perpendicular from the side you were just sewing on.
Fold the binding strip back down on itself and match it to the edge of the quilt you just sewed it to, and the next edge of the quilt you’re about to sew it to.
Pin this fold in place, and pin the binding strip to this edge of the quilt and continue to sew it, again stopping ¼” from the next corner and repeating the folding process described above.
Sew the binding on each side until you are on the side you started on.
Here is a quick video on making a mitered corner!
Connecting the Ends of the Binding
Stop stitching about 14” – 16” from where you started. Backstitch. Cut the thread but not the binding strip. Remove the quilt and binding strip from the machine.
You now have two “tails” of the binding strip, tail #1 from where you started stitching it to the quilt and tail #2 from where you ended.
You’ll need to join these tails together. The binding strip needs to be continuous to finish sewing it to the edge of the quilt. Follow the steps below to join the tails!
Here is a quick video on how to connect the ends of the binding!
STEP 1
Lay tail #1 of the binding strip along the unsewn edge of the quilt. Trim it at a 90° angle about half way between this unsewn edge.
STEP 2
Lay tail #2 of the binding strip over tail #1 along the unsewn edge of the quilt. Measure 2 ½” beyond the trimmed straight edge of tail #1. Mark this 2 ½” measurement with a pin or pencil. Trim the tail #2 at a 90° angle. The two trimmed binding strip tails should overlap by 2 ½”.
STEP 3
Unfold the two tails so they lay flat. Pin the two tails together perpendicular to each other (right sides together). Use a fine pencil to draw a diagonal line from the corner of tail #2 to the opposite side, as shown here.
Sew along the drawn diagonal line. Fold binding strip in half again. The continuous binding strip should now lay flat along the unsewn edge of the quilt.
If the binding is too long or too short you will need to shorten lengthen the continuous strip before trimming it. Trim the outside corner ¼” from the seam and finger press the seam open.
Fold it in half again and finish sewing the binding strip to the quilt.
Trim the Batting and Back
Trim the batting and quilt back to ¼” from the edge of the quilt top. I use a ruler and a rotary cutter to accomplish this task. Work carefully so you don’t cut into your quilted project.

Hand-Stitch the Folded Binding Edge to the Quilt Back
Here is my FAVORITE part of the process, hand-stitch the folded edge of the binding strip to the back of the quilt.

When you get to the corner turn the corner right-side out and make a sharp mitered corner.
I tack a few stitches up the corner to hold it in place. Continue stitching along all sides and corners until…
VOILA! Your binding is complete!
If you’d like, you can add a label to the back of your little quilt.


If you’d like to see some of my other patterns that include a pillow, check out the Friendship Wreath and the Sweet Pea quilt posts!!


