This scrappy mini quilt pattern is an easy project for a beginning quilter.
Measuring just 12” x 12”, the Shamrock Shenanigan mini quilt pattern gives you the perfect size quilt to decorate a shelf or table. Or add a sleeve to the back of the quilt, and hang this Shenanigan up!!
There’s nothing complicated about the pattern. This quilt can easily be made in a day or over the weekend!! Using such small squares, you can either purchase small amounts of fabric or just use scraps to create this lucky beauty!
In this post you’ll find the complete set of directions to make the Shamrock Shenanigan quilt.

Click here if you’d like to purchase the PDF of this mini quilt pattern.
General Sewing Directions for this Scrappy Mini Quilt Pattern
The directions for this Shamrock Shenanigan quilt are for rotary cutting, machine piecing, machine quilting, and the binding is hand-stitched to the quilt back.
Accurate cutting and sewing enhances your final product. Pin your pieces together before sewing them to ensure proper seam alignment.
Use a ¼” seam allowance. I recommend using a special presser foot with a ¼” guide if you have one for your machine. This will help you get uniform seams, and matching corners!
Follow the directions described below as you press open the seams. Each individual row is pressed in the opposite direction of the previous row to eliminate bulk and help seams to lay flat. Rows sewn together are then all pressed in one direction for a uniform look.
The pattern calls for machine quilting, but this quilt is so small you could easily hand quilt it!
The finished quilt measures 12” x 12”.
This scrappy, mini Shamrock Shenanigan quilt is so cute it’ll steal your heart! But not your pot of gold, lol!!! It takes very little fabric to make this quilt. Carefully read through all the information below on how to create this little scrappy beaut!
Let’s get started…
Fabric Requirements for this Mini Quilt Pattern
Just in time for St. Patrick’s Day, and with a longing for spring, I used a variety of green prints for this Shamrock Shenanigan quilt.
But this quilt doesn’t have to just be for St. Patrick’s Day! To keep the “luck ‘o the Irish” close by, display this fun mini quilt all year round!!
For the background I used a variety of buttery cream-colored fabric to show off the green shamrock. You could also use a darker green palette for the shamrock and a light green for the background. Or vice versa! Have fun deciding, and remember…there’s no rules!!
Quilt Top
Shamrock: Cut 56 – 1 ½” green squares. I suggest using at least 8-10 different prints. Either raid your stash, or purchase a few new fat quarters. You will use 11 of these squares to make half square triangle blocks.
Background: Cut 55 – 1 ½” cream squares. Again, use a variety of at least 8-10 different prints from your stash or fun new fat quarters. You will use 11 of these squares to make half square triangle blocks.
Border: Cut 22 – 1 ½” green squares and cut 22 – 1 ½” cream squares. As a variation, if you choose to create an all green border or an all cream border then obviously you’d need to cut a total of 44 – 1 ½” squares of all the same color.
Quilt Back
The back of this quilt uses 1 fat quarter.
Trim the fat quarter to a 17″ x 17″ square. I always extend the size of the quilt backing 2″ beyond each side of the finished quilt top to allow for stretching of the quilt top that happens when machine quilting.
If you want to get fancy, you could piece together some of the fabrics used in the shamrock to create a unique quilt back. Use your imagination!
Binding
You’ll need a total of 1/6 of a yard of fabric for the binding.
Either cut two 2 ½” x 44” strips, or cut four 2 ½” x 22” strips of coordinating fabric. I used a medium green fabric with some dark green and some light green in the pattern to compliment the shamrock.
Sometimes, I’ll piece different fabrics together for the binding. With the scrappy shamrock in this quilt, a scrappy binding like that would be super cute too!!
Batting
You’ll need a piece of 17″ x 17″ thin cotton batting to make this quilt.
Always extend the batting 2″ beyond each side of the finished quilt top to allow for stretching of the quilt top that happens when machine quilting.
I like to use Warm & Natural needled cotton batting, but there are other similar types of cotton batting on the market. For my quilt, I had scraps of batting in my cupboard from a previous quilting project. What a great way to use up leftover batting!
Sew the Half Square Triangle Blocks
For the corners of the shamrock and along the stem, you’ll use half square triangle blocks to obtain the “curve”. In all, you’ll need 11 half square triangle blocks. Follow this process to create each of the 11 half square triangle blocks needed.
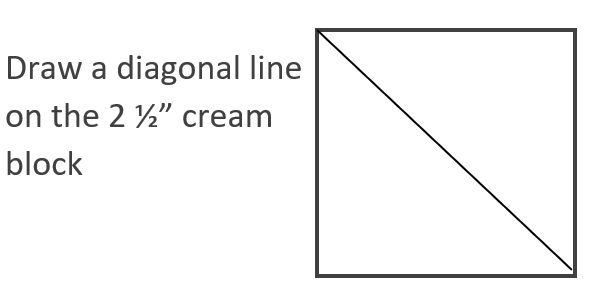
Choose 11 of the cream blocks. Using a fine pencil, lightly draw a diagonal line on the wrong side of each of them. Now, place the right side of a green block and the right side of a cream block (the one you just drew the line on!) together. With the diagonal line facing you (wrong side up!), sew along the line. Trim ¼” from seam. Press open toward the colored side. This half square triangle block should again measure to be a 1 ½” square.


Assemble the Top
Now that you have all your 1 ½” squares cut out and your half square triangle square blocks ready, you want to plan how they’ll be arranged to make up the quilt top.

I like to lay all my squares on a card table next to my sewing machine and play with arranging them until I get the look I want for this scrappy mini quilt. Follow the diagram to obtain the shape of the shamrock.
The layout will be 12 squares across and 12 squares down.

Sew the Rows
The quilt top has 12 rows. Begin stitching squares together (right sides facing) to complete each row. Remember to use a ¼” seam allowance for all seams. I really like to use my ¼” seam foot to make sure all my seams are exactly ¼”!! This is especially important when sewing such tiny squares together.
If you don’t have this type of foot, make sure you know exactly where your ¼” sewing line is on your machine, and be careful to follow it!
As you complete a row, lay it back down on the table in the right placement to make sure you don’t mess up your arrangement of blocks.
Pressing the Blocks and Rows
I wait to press the 12-block rows until I have each of them sewn together. Be careful to just “press” and NOT “iron” the seams in a back-and-forth motion, or your quilt will stretch out of shape.
Begin by pressing the seams of the first row all in one direction. Press the seams of the second row in the opposite direction. Continue to rotate the pressing direction of each row until you have the seams of all rows pressed. Think…odd rows 1, 3, 5, etc. press the seams to the right. Even rows 2, 4, 6, etc. press the seams to the left.

By using this rotating direction of pressed seams, you will have less bulk when you sew the rows to each other. This method of pressing distributes the bulk, which will make you happy when you machine quilt your project! Bulky seams can lead to bumpy quilting patterns, broken thread, and overall unevenness of your machine-quilted quilt top.
Now that you have the pieced rows pressed, sew them together! Pin rows 1 and 2 together, right sides together. Make sure to line up the seams, and pin to hold them in place. Remove the pins as you come to them when you’re stitching the ¼” seam.
I like to press each set of rows as I sew them together. The rows all get pressed in one direction, either towards the top or towards the bottom. By pressing them all in one direction it will make for a more uniform, and smooth, quilt top. Repeat until you have all 12 rows pieced together and pressed.

Nicely pressed quilt blocks and tops are a work of art, and a skill to develop! I love how pretty they look from the back too!!
Finishing the Mini Quilt Pattern
Now that you have your quilt top sewn together, it’s time to finish it! Some people call the completed quilt top a flimsy, and I really like this term. It’s a flimsy because you haven’t yet added the 3 B’s to your quilt – batting, backing, and binding!
Layering the Top, Batting, and Back
I refer to layering the quilt as “sandwiching”. You need to sandwich the top and back with the batting in the middle. For a larger quilt, this process takes a bit more time and steps. But for this mini quilt, it’s a breeze to sandwich the layers together!
Prepare the Quilt Back
On a table or countertop, use masking or painter’s tape to tape down the backing fabric. As you tape the back to the table, you’ll want to make sure the fabric is smooth, without wrinkles. Also, make sure the right side of the fabric is facing down!
Next add the Batting
Lay the batting on top of the taped-down quilt back, and move your hands across it to smooth it all over. This will get rid of any wrinkles in the batting, and help to adhere it to the backing fabric. This quilt is so small, you don’t need to use basting spray to adhere the layers together. Just a few pins will do the trick!
Top it Off with the Flimsy
Once you have the batting placed on top of the quilt back, center the top of the quilt (the flimsy!) over the two bottom layers. Right side facing up, of course! The two bottom layers of the quilt (the back and the batting) should extend about 2” all around the outside edges of the quilt top.
Move your hands across the quilt top to smooth it all over, and help remove any wrinkles. This will also help adhere the quilt top to the batting a little bit.
Baste the Layers Together
Once you have the top of the quilt all smoothed out, use large safety pins to baste all three layers together. I like to use 1 ½” stainless pins, and I keep them all in a cute old canning jar that was my grandma’s.
Put a pin in each corner of the quilt sandwich, in the middle, and around the quilt so the three layers don’t move around when you’re machine quilting this project.
I used about 12-14 pins to hold the sandwich together. You really don’t want to use more than this or you’ll be needing to stop a lot when you’re quilting to remove pins, which upsets the mojo of your quilting rhythm, lol!
“Quilting” the Layers Together
I chose a free-motion machine quilting design to permanently join all three layers of the Shamrock Shenanigan together. You’ll need a darning foot to free-motion quilt, and you’ll need to either be able to lower the feed dogs on the machine or place a special cover over them.
I used a simple meandering stipple stitch to machine quilt my layers together. Use whatever free-motion stitch you’d like, or use a straight stitch to quilt in the ditches or along the seams.

If you’re new to machine quilting, you might want to purchase a book on the topic like Free-Motion Quilting Made Easy by Eva A. Larkin or 60 Machine Quilting Patterns by Pat Holly and Sue Nickels.

I found these books to be very helpful as I was learning how to machine and free-motion quilt.

As an alternative, you can hand-quilt these layers together too.
Binding the Quilt
When you’ve finished quilting the layers together, it’s time to bind the edges of your quilt! This could be a lesson in itself!! I’ve described the process of binding a quilt in a previous post, click here to read through it!
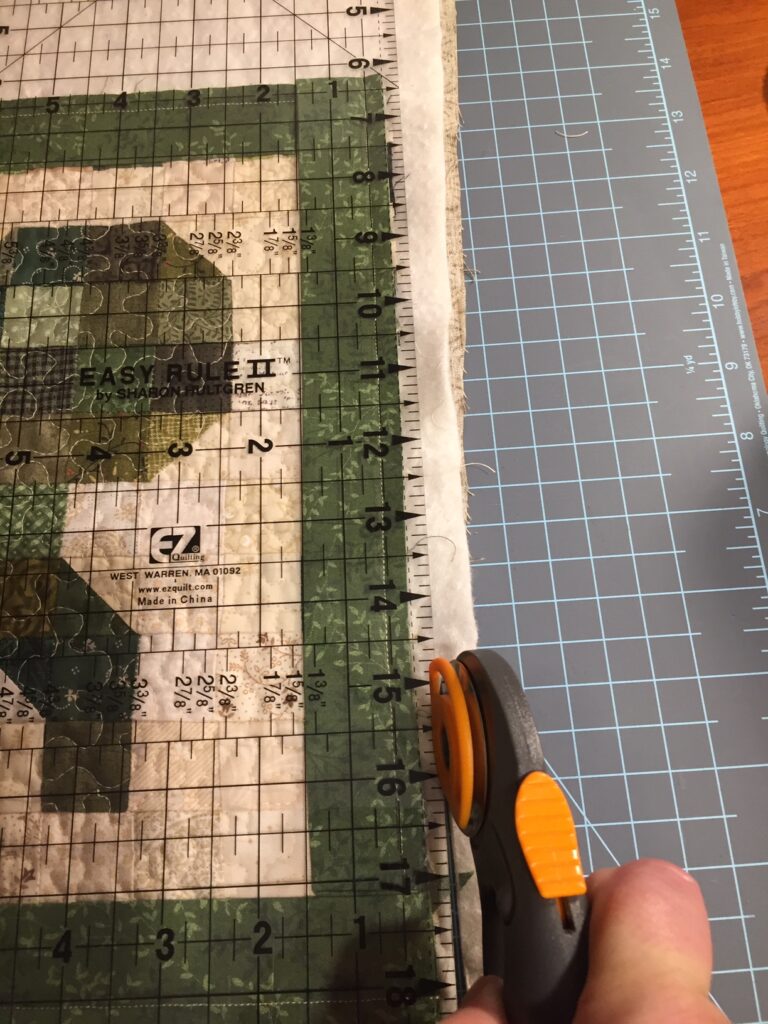
Once you have the binding stitched all along the edge of the quilt, it’s time to trim.
Trim the batting and back later to within 1/4″ of the binding and top layer. Then hand-stitch the binding to the back side of the quilt.
These cute little clips help hold your binding in place as you hand-stitch it to the back of the quilt.


If you’d like, you can add a label to the back of the Shamrock Shenanigan quilt.
I hope your finished quilt brings you a bit ‘o luck!!!

“May you always be blessed with walls for the wind. A roof for the rain. A warm cup of tea by the fire. Laughter to cheer you. Those you love near you. And all that your heart might desire.”
~ Irish Proverb
Time for a True Confession…
I called this little quilt Shamrock Shenanigan, because I felt like the leprechauns were tricking with me as I made it!
I was having one of those days when strange things seemed to be happening to me. Nothing big, just little things that made me go, “hmmm…”
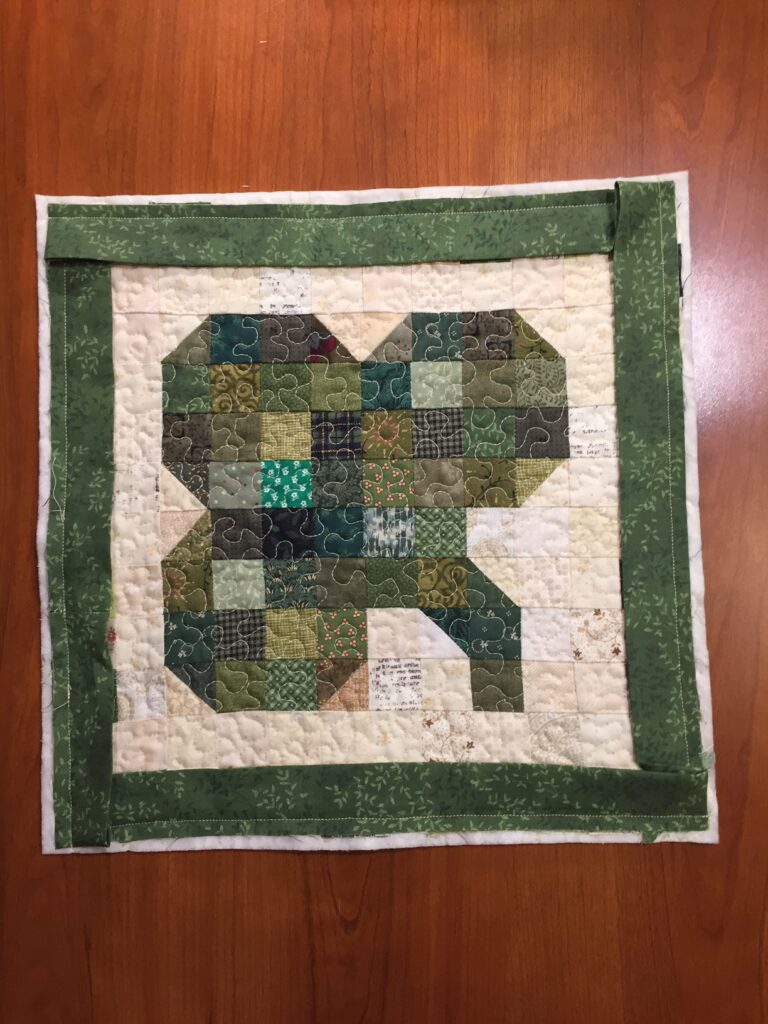
When I was all done sewing, quilting, and stitching the binding on I sat back to admire this little shamrock. I had looked at it throughout making it, and had been very careful in making sure I wasn’t messing anything up!
But when it was all done I discovered I’d misplaced the blocks that make up the left-side vertical row. Darn it!
Instead of having a green block in the corner, then a cream block, then another green block and so on I had two green blocks next to each other on the top of the right vertical row. And two cream blocks on the bottom of the right vertical row.
Ugh! How did that happen?!?!

One for the Swear Jar…
Ok, here’s something I might not confess too often. But to be a quiltmaker means that sometimes not-so-nice words escape. #@$%!!! There went a quarter for the swear jar, lol!!
Well, I had a couple choices to make at this point. I could take off the binding and tear out the quilting in that area so I could fix the layout of the blocks – cream/green/cream/green, etc.
Or… I could make a new Shamrock Shenanigan (which I probably will sometime down the road!).
Or… I could use this perfectly imperfect little quilt to show you that everyone makes mistakes.
Maybe you noticed my mistake, and maybe you didn’t. I know it’s there. But instead of being upset over it, I decided to let it be a happy little mistake and just blame it on the leprechauns playing a shenanigan on me!!
Darn little leprechauns, lol!!!
~Bonnie