

Are you wondering about what supplies you’ll need for quiltmaking? Let’s start at the beginning…
Maybe you’re still pondering the idea of starting this new hobby, or maybe you’ve already made the decision to sew your first quilt. Yay! Congratulations!! But where to start??
Starting something new can be overwhelming and intimidating. It seems that January, for me anyway, is a popular month for starting something new. I love the promise of a fresh start that January brings! And I think winter is the perfect season to cozy in and start quiltmaking!!
Below is the list of basic tools, equipment, and supplies you’ll want to gather to start your quiltmaking adventure!
Sewing Machine
Unless you’re planning on doing all your sewing and quiltmaking by hand, one of the supplies you’ll need is a sewing machine.

You don’t need to invest a ton of money to get a good machine to start sewing quilts. I inherited my Grandma’s vintage Singer sewing machine.
When I started quilting I spent about $150 on a pretty basic, brand-new Singer, and I still love sewing and quilting on that machine!
Don’t be afraid to check out online marketplaces or thrift stores if you’re just not sure how big of an investment you’re willing to make. However, buying a used machine might come with issues, so I do recommend investing in a new machine even if it’s a basic, inexpensive one.
If you’re thinking you’d like to start out with a machine that has more bells and whistles, there are a lot of reviews and recommendations on the internet.
Last year I upgraded to a Janome Memory Craft 6300 to help me machine quilt larger size quilts with more ease, and I love it too!

If you’re willing to invest a bit more on a new sewing machine, you’ll want to make sure your machine has features like the bobbin stopping in the down position, foot pedal speed adjustment, being able to drop the feed dogs (rather than cover them with a plastic tool), and the larger the machine is in size the larger the “throat” of the machine will be which makes machine quilting a bit easier for you (the throat is the area between the needle and the right side, the place with fabric fits between as you’re feeding it through the machine).
While I love my Janome (especially for machine quilting), I do have to say that my little Singer doesn’t have any of the fancier features and I’ve effectively made over a dozen full-size quilts on it, machine quilting all of them beautifully! I’m still using it to do a lot of my piecing (even still quilting small projects on it!).
There are a lot of websites that rate sewing machines to purchase for quilting in a variety of price ranges, check them out!
Basic Supplies for Quilting
Pins and Needles


There are so many pretty pins on the market to use for quilmaking! You can buy pins with cute butterfly or daisy heads (just about anything), but all you “really” need are long, thing, sharp pins that are rust-proof and have a bigger plastic or glass head to grab onto. I just use basic pins. The pins I like to use are 1 ¾” long and have a 1/8” round head at the top.
Oh, and don’t forget a pincushion to keep them handy next to your sewing machine! You can purchase a basic pincushion, or there are a lot of cute pincushion patterns out there for you to make your own (these handmade cuties are really nice little gifts for your sewing friends too!).
When I start sewing a new project, I always like to start with a new, sharp needle in my machine.
Needles come in different sizes which are numbered (and sometimes color-coded) for the different weights of materials you might be working with. The higher the number of the needle the finer it is.
I like to purchase needles that come in a variety package so I have different sizes available. For piecing quilt fabric I use a size 11 or 14 needle, and for machine quilting I use a size 16 needle.
Play around with the different size needles in your variety package and use the one that works best for you and your machine! You’ll want to pick up a few needles for hand-stitching also, these supplies will come in handy!
Seam Ripper

The seam ripper is definitely your friend, and any brand seam ripper will do the job! I use mine on a daily basis, there is no shame!
You’ll want to make sure you have one on hand next to your machine too because mistakes will happen!!
Don’t get discouraged, just use your seam ripper to carefully remove stitching errors and carry-on.
I always refer to my quilts as being “perfectly imperfect”. You’ll eventually get the hang of which errors you need to remove, and which ones you can live with.
Rulers
There are tons of plastic rulers on the market. And you can certainly go down a rabbit hole collecting these supplies!!

There are rulers you can purchase to cut specific types of pattern pieces (like triangles or dresdens), and there are different sizes of rulers.
You can find these rulers at quilt shops, big box stores that sell sewing supplies, or online.
To start out you’ll want a ruler that measures down to the 1/8”, and is long enough to allow you to measure bigger pieces of fabric.
My go-to ruler is my “EASY RULE II by Sharron Hultgren” 6 ½” x 24” rectangle ruler. The simple markings on this one and the clear plastic make them easy to use! I think it’s really easy to see exactly where the measurements are on these rulers.
Other rulers that I’ve collected have more complex-looking markings and are colored plastic, but when I use them I always struggle with whether I am on the right measurement line or not. The “EASY RULE II by Sharron Hultgren” is the ruler I recommend.

Another ruler that I use all the time is my “EASY SQUARE JR. by Sharon Hultgren” 6 ½ x 6 ½ square ruler. This ruler is just really easy to maneuver around when cutting small pieces of fabric. It’s nice to have a variety of rulers on hand. But you only need one or two to start out with.
Cutting Tools and Cutting Mat
If you’re beginning to make quilts, you’ll definitely want to invest in a heavy, self-healing cutting mat to add to your collection of quiltmaking supplies! Out of your list of supplies, these are on a bit more of the pricey side. But well work the investment!

Cutting mats come in different sizes. I have a 12” x 18” mat next to my sewing machine. And a 5” x 17” mat that is handy when I’m travelling.
My 24” x 36” mat is my favorite and a “must” to cut large pieces of fabric on. This is the size I recommend you invest in also to get started on the right foot. Mine is a Fiskars, but there are several good-quality brands available.
Tip: You’ll want to store your cutting mat lying flat on your cutting table (or under the bed!). Or hang it flat on the wall so it doesn’t take on a “wavy” shape! The mat needs to stay flat to measure accurately and cut straight. These mats are amazing, and I’ve used mine for years!!
When shopping for rotary cutters, there are a lot of different brands to choose from. I have several different ones, but my favorite is the Fiskars Comfort Loop Rotary 6 in. Fixed Blade Cutter. I really like the ergonomics of this rotary cutter.

The cutting blades are replaceable on rotary cutters. I always need to remember to change out the blade from time to time. This will help you cut crisp, accurate quilt pieces.
Safety First When Cutting the Fabric. There are special cut-resistant gloves you can purchase and wear to prevent cutting injuries while rotary-cutting.
Make sure you have a good, sharp 8” scissors on hand next to your machine that you only use to cut fabric (not paper).
I’ve even taken a Sharpie and labeled the blade of my sewing scissors “fabric only!”, so no one grabs it and uses it to cut paper which will dull the blades.

Fiskars has usually been my go-to brand for sewing scissors that hold a sharp edge. But there are other brands on the market that I’m sure work just as well.
Find one that you’ll designate as your “fabric only!” scissors too.
You’ll also need a utility scissors for cutting paper and plastic pattern pieces and templates. I also like to have a smaller “embroidery” scissors nearby to snip small threads, especially when I’m hand-stitching.
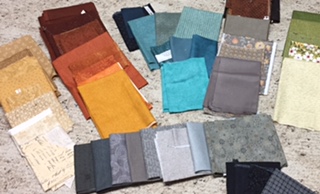
Fabric and Thread
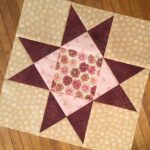
For me, working with fabric is the absolute best part about quiltmaking!
I’ve been collecting fabric for years, a passion passed down from my mom!!
As a child I can remember spending hours with my mom at fabric stores picking out just the right fabrics. When I was young, she sewed almost all my clothes. It was so fun to be able to help pick out the fabrics that she’d transform into my new outfits. Since she’s passed, I inherited all of my mom’s fabric — too precious!!
I think that’s why I totally feel that something hand-sewn = love! I think that’s why I love gifting quilts I’ve made to others!!
When picking out fabrics for your quilts you’ll want to make sure you get 100% premium cotton.
There are varying grades of cotton fabric. The higher the quality the less the fabric will stretch when you’re working with it. This will make it easier to match corners and blocks, and have a nice squared-up quilt.
I recommend premium cotton quilting fabric. This is like the fabrics you’ll find at your local or online quilt shop (I love patronizing small businesses!). You can also find premium fabric at the big box fabric stores.

You’ll want to use cotton or cotton-covered polyester sewing thread to piece your quilt. I usually keep a nice supply of neutral-colored thread on hand. You’ll want to keep 3-4 spools handy. This way you don’t need to stop everything and run to the store when your thread runs out.
Use a color thread that will blend in well with the colors of your quilt. I like to keep using the same colors so I can easily remember which one to buy when I’m stocking my supply.
Iron and Ironing Board
You’ll need to have an iron to press the seams on your quilt blocks, and when you sew the blocks and rows together.
For pressing the quilt blocks and pieces, I’ve invested in a 12” x 12” wool pressing mat which works really well.

I set up a wooden TV tray with the wool mat atop of it next to my sewing table. This works well to do all my small pressing. But you don’t have to make this investment, a regular ironing board will work just fine!
Tip: Always just “press” the seams, rather than “iron” them in a back-and-forth motion.
All in all you don’t need to spend a ton of money to start quiltmaking. But you do need to invest in the basics.
Then, over time you can add to your collection with more quiltmaking supplies to experiment with and have fun using.
——————————————————————————————————————–
As a former 4th grade teacher, I’d always tell my students there is more than one way to do something. The way to solve a problem that makes sense to you might not make sense to someone else.
It’s true with quiltmaking too!!
There are many ways to arrive at the end result of making a quilt! As you hone your skills and continue to explore the art of quilting, you’ll find variations of ways to perform skills and techniques. You’ll eventually choose your “go-to” favorites.
You might even discover a whole new way of doing something!!
~Bonnie

[…] Also, make sure to invest in a good cutting mat to place under your fabric as you cut it with the rotary cutter. Here’s a link to my previous post where I’ve described some of these tools. […]