This Balsam Gnomes Christmas Tree Skirt Pattern is a great way to add a homemade touch to your holiday décor! This gorgeous tree skirt is a simple Simon weekend project! If you’re looking to make a new Christmas tree skirt, this free tree skirt pattern is for you!!
The adorable gnomes in this easy project add an exciting spin on a traditional Christmas tree skirt! It’s the perfect finishing touch to ensure a festive season of holiday fun!! This pretty patchwork tree skirt is the perfect way to add that magical touch to your home.
Also, rather than being a circle or hexagon tree skirt like many other tree skirt patterns the Balsam Gnomes holiday tree skirt project is square! Just one more way this stunning tree skirt stands out from all the others!! Yet, at 45” x 45” this quilted tree skirt is still the standard size to adorn your tree!
Time for a New Tree Skirt!
Last year I was packing away my old tree skirt and just knew I needed to make a new one. I love how it’s turned out!!
If you don’t need a new tree skirt, you can skip the steps of making the opening. Just add another gnome or tree to the side where the opening side would be and you can turn this tree skirt pattern into a wall hanging. Or you could make several and use them as table toppers for your holiday decor!
The entire free pattern, including a free template, is found below. I love coming across free quilt patterns, so I love to share my patterns with you. But if you’d like to purchase an ad-free pdf pattern for this Balsam Gnomes quilted Christmas tree skirt it’s available in my Etsy shop!
If you like this design, you should check out the Balsam Gnomes Table Runner and the Balsam Gnomes Throw Quilt!! These two patterns are also available to purchase as ad-free PDFs in the Lakegirlquilts Etsy shop!!
My Balsam Gnome quilts are cousins to my Birch Gnomes quilts, lol!!
Post contains affiliate links and we earn a small commission if you shop through the links on this page, including Amazon Associate links. For more information please read the disclaimer on the Privacy Policy page.
General Sewing Directions
The directions for this quilt are for rotary cutting, machine piecing, machine quilting, and the binding is hand-stitched to the quilt back.
Accurate cutting and sewing enhances your final product. Pin your pieces together before sewing them to ensure proper seam alignment.
Use a ¼” seam allowance. I recommend using a special presser foot with a ¼” guide if you have one for your machine. This will help you get uniform seams, and matching corners!
Fabric Requirements
The Balsam Gnomes Christmas tree skirt quilt pattern uses traditional colors. The gnomes are created using a variety of red prints, along with white fabric for the beard and peach fabric for the nose. The balsam trees are created using a variety of green prints, along with a little brown for the trunk. For the background I used a variety of buttery cream prints to show off the gnomes and trees.

Because each gnome and tree uses little fabric, you can definitely use leftover fabric to make this scrappy quilted tree skirt. Also, have fun choosing your color palette, and remember…there are no rules!!
Red Fabric:
The total fabric needed is about ⅜ yard. However, to achieve the scrappy look of this quilt I suggest using a few different prints. Either raid your stash, or purchase a few new fat quarters.
White Fabric:
The total fabric needed is just under ¼ yard. You’ll need a strip at least 5” wide.
Peach Fabric:
The total fabric needed is less than ⅛ yard. You’ll need a strip at least 2” wide.
Green Fabric:
The total fabric needed is about ⅜ yard. Use a few different prints.
Brown Fabric (tree trunks and binding strip):
The total fabric needed is 1/2 yard.
Cream Fabric:
The total fabric needed is about 1 ¾ yard. However, to achieve the scrappy look of this quilt I suggest using a few different prints.
Backing Fabric:
You’ll need about 1 ½ yards of wide-back fabric to form a 52” x 52” square, use coordinating fabric. Or you can use 2 – 1 ½ yards of 42” – 44” fabric (3 yards total) pieced together (or smaller pieces of fabric pieced together). In total you need a piece of 52” x 52” fabric (or pieced fabric) for the back.
Batting:
You’ll need a piece of 52” x 52” thin cotton batting (like Warm & Natural) to make this quilt.
Fusible Web (like Wonder-Under):
You’ll need a 2” x 16” strip or a 3” x 10” rectangle.
Directions for Cutting Fabric
Using a self-healing cutting mat and your favorite rotary cutter, follow the directions below!
Red Fabric:
Cut 5 – 6 ½” x 8” rectangles* and Cut 5 – 2 ½” x 7 ½” strips
White Fabric:
Cut 5 – 4 ½” x 8” rectangles*
*Sew 1 large red rectangle to 1 white rectangle along the 8” side to make an 8” x 10 ½” rectangle, press seam toward red. Repeat for all 5.
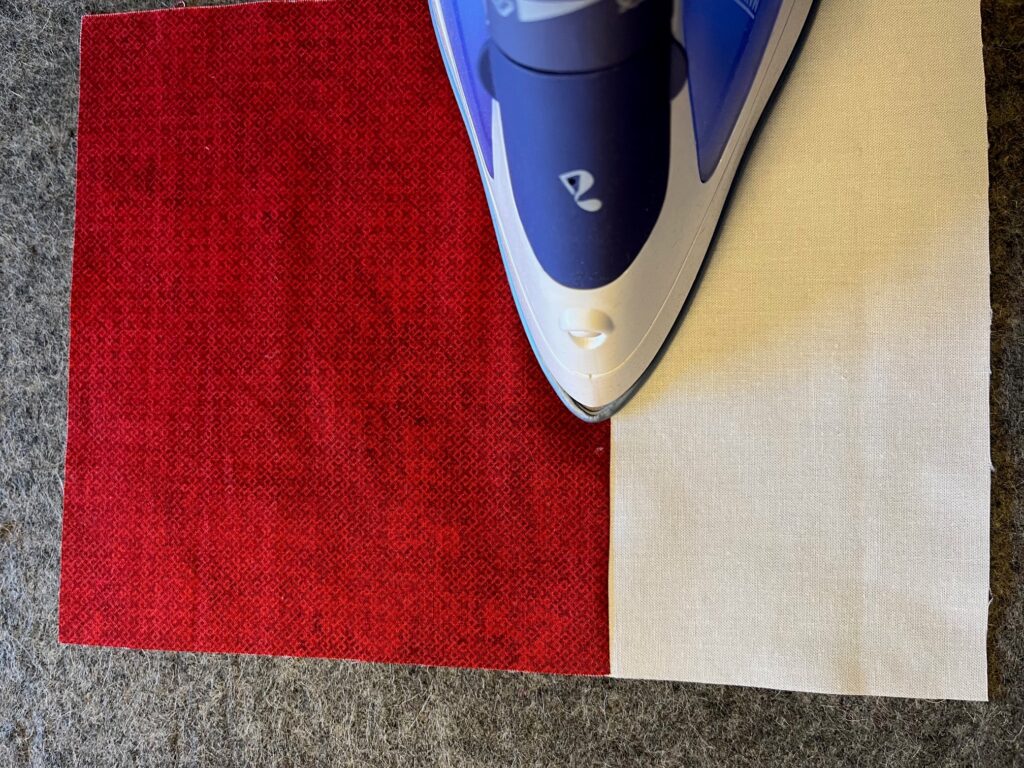
Then use these red/white units to cut 5 triangles from Template A, following layout directions on the bottom of the template.
Peach Fabric:
Cut 1 – 2” x 16” strip or cut 1 – 3” x 10” rectangle**
Fusible Web:
Cut 1 – 2” x 16” strip or cut 1 – 3” x 10” rectangle**
**Iron fusible web to the back side of the peach fabric, paper side facing up. When cooled, carefully peel off paper backing. Then use a scissors to cut 5 oval noses from Template D.
Brown Fabric:
Cut 6 – 1 ½” x 2 ½” strips
Cream Fabric:
Cut 12 – 2 ½” x 3 ½” strips and Cut 1 – 7 ½” x 12 ½” rectangle and Cut 16 – 6 ½” x 6 ½” squares and Cut 4 – 11” x 11” squares and Cut 11 triangles from Template B and Cut 11 triangles from Template C
Green Fabric:
Cut 6 triangles from Template A
Binding:
Cut 6 – 2 ½” x 44” strips
Backing:
Cut a 52” x 52” square from the wide-back fabric. If using 42” – 44” wide fabric sew together 2 – 1 ½ yard pieces and trim to 52” x 52”. Or sew smaller pieces of fabric together and trim to achieve a 52” x 52” square.
Batting:
Cut a 52” x 52” square
Sew the Blocks
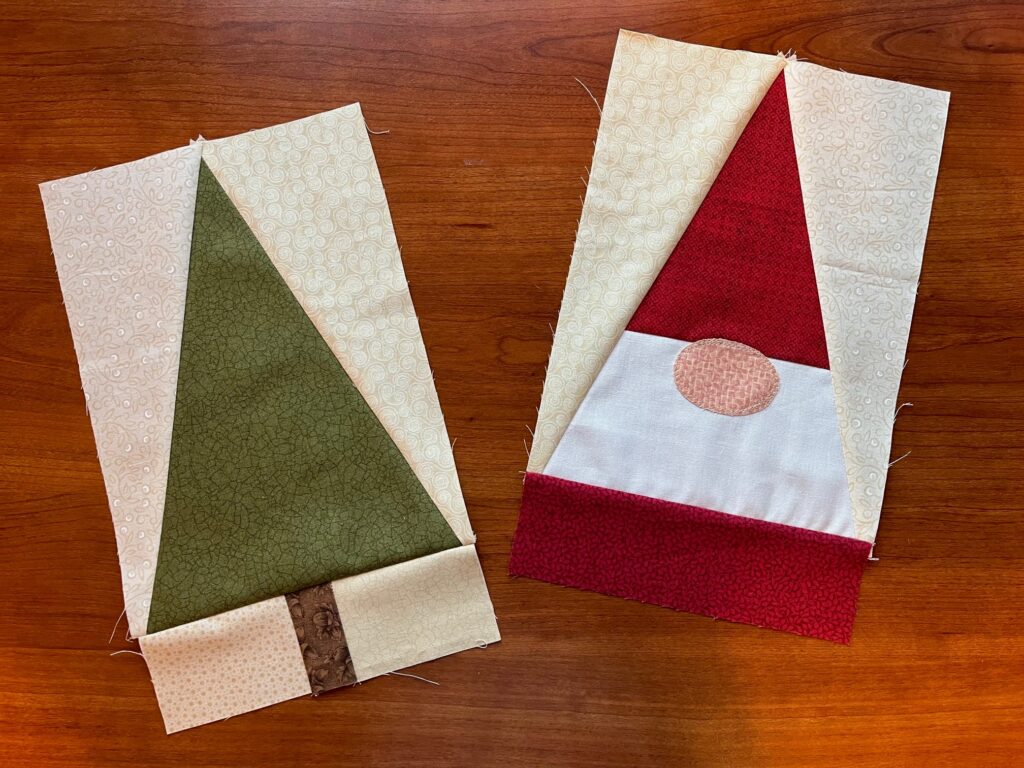
Gnome Block:
Follow these directions to sew each of the five gnome blocks.
Sew a cream triangle from Template B to the left side of the red/white gnome triangle.
Press seam toward cream triangle.
Sew a cream triangle from Template C to the right side of the red/white gnome unit. Press seam toward cream triangle. This unit should measure 7 ½” x 10 ½”, carefully trim if needed.
Sew the 2 ½” x 7 ½” red strip to the bottom of the gnome beard to represent the body.

Place the peach oval nose cut from Template D on the face of the gnome. I like the nose to be mostly on the white with a little sticking above onto the red. Press to set nose in place via directions for the fusible web. Carefully stitch ⅛” or so around the edge of the nose, 2-3 times around. Use a wider length of stitch than normally used. It’s ok if the stitching overlaps and looks a little messy, that adds to the charm of this gnome block and makes each one unique! Who knew applique was so simple?!?!
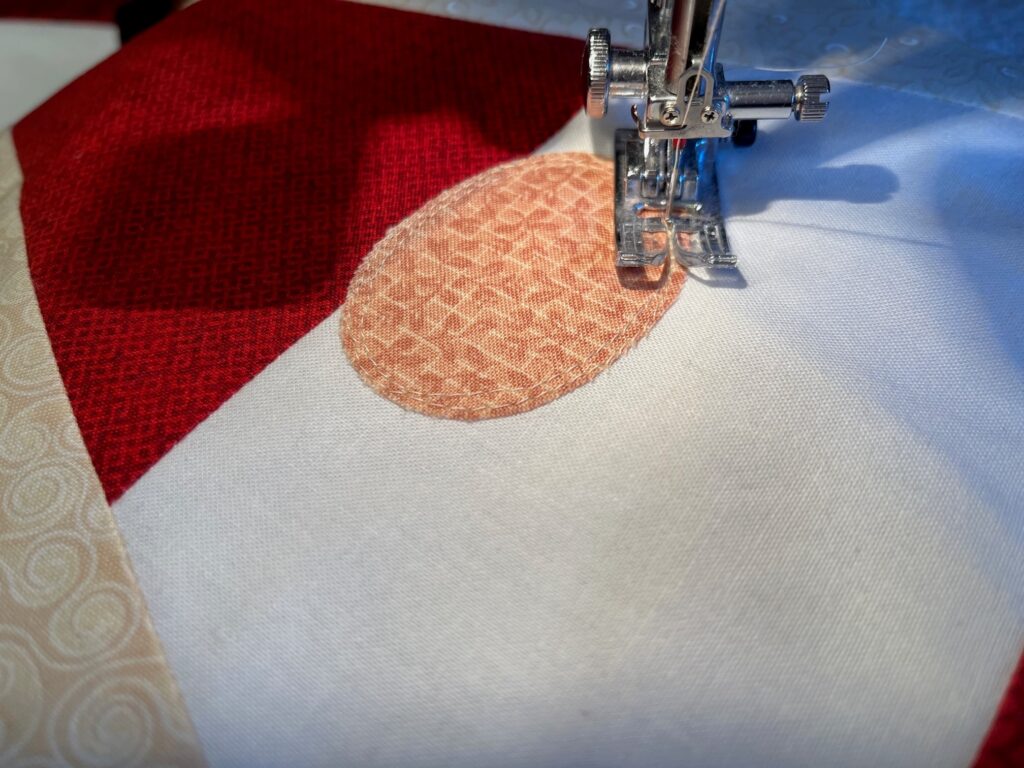
Unfinished block should measure 7 ½” x 12 ½”, trim if needed.

Balsam Block:
Follow these directions to sew each of the six balsam blocks.
Sew a cream triangle from Template B to the left side of the green triangle. Press seam toward cream triangle. Sew a cream triangle from Template C to the right side of the green triangle unit. Press seam toward cream triangle. This unit should measure 7 ½” x 10 ½”, carefully trim if needed.
Sew a 2 ½” x 3 ½” cream strip to each side of the 1 ½” x 2 ½” brown strip, sewing along the 2 ½” sides. Press seams toward brown center.
Sew this cream/brown unit to the bottom of the green triangle unit.
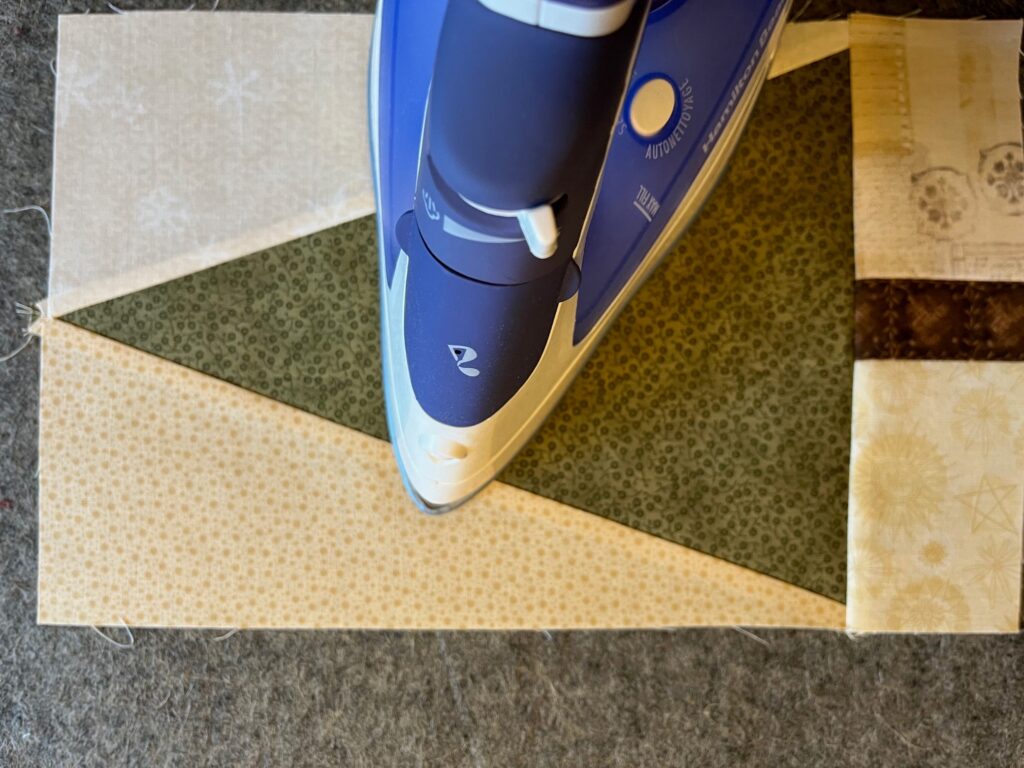
Unfinished block should measure 7 ½” x 12 ½”, trim if needed.
Four Patch Blocks:
You’ll make 4 – 12 ½” x 12 ½” (unfinished) corner blocks, and 1 – 21 ½” x 21 ½” (unfinished) center block.
Corner Blocks:
Each corner block is made from four 6 ½” x 6 ½” cream squares. To make the block lay out four squares in the order you’d like them to be arranged.
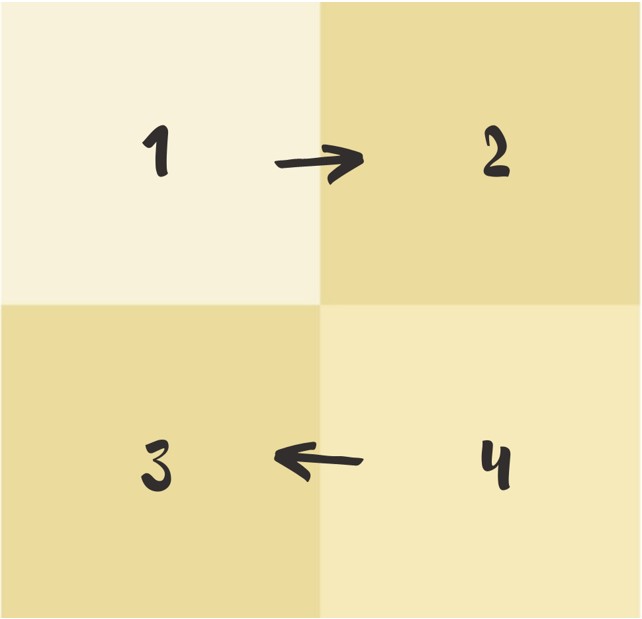
Start by sewing two rows together. To do this sew squares 1 and 2 right sides together, press seam toward square 2. Then sew squares 3 and 4 right sides together, press seam toward square 3. Lay out these two rows, again in the order you’d like the block to be, and sew the rows (right sides together) to each other. Make sure to “nest” the center seams, which should be facing in opposite directions. Press seam either toward the top or toward the bottom of the block. Either direction is fine.
Center Block:
Follow the same directions as for the corner blocks, only this time you’ll be using the 11” x 11” cream squares of fabric to make this four patch block to make up the center of the tree skirt. See directions above.

Sew the Quilt Top Together
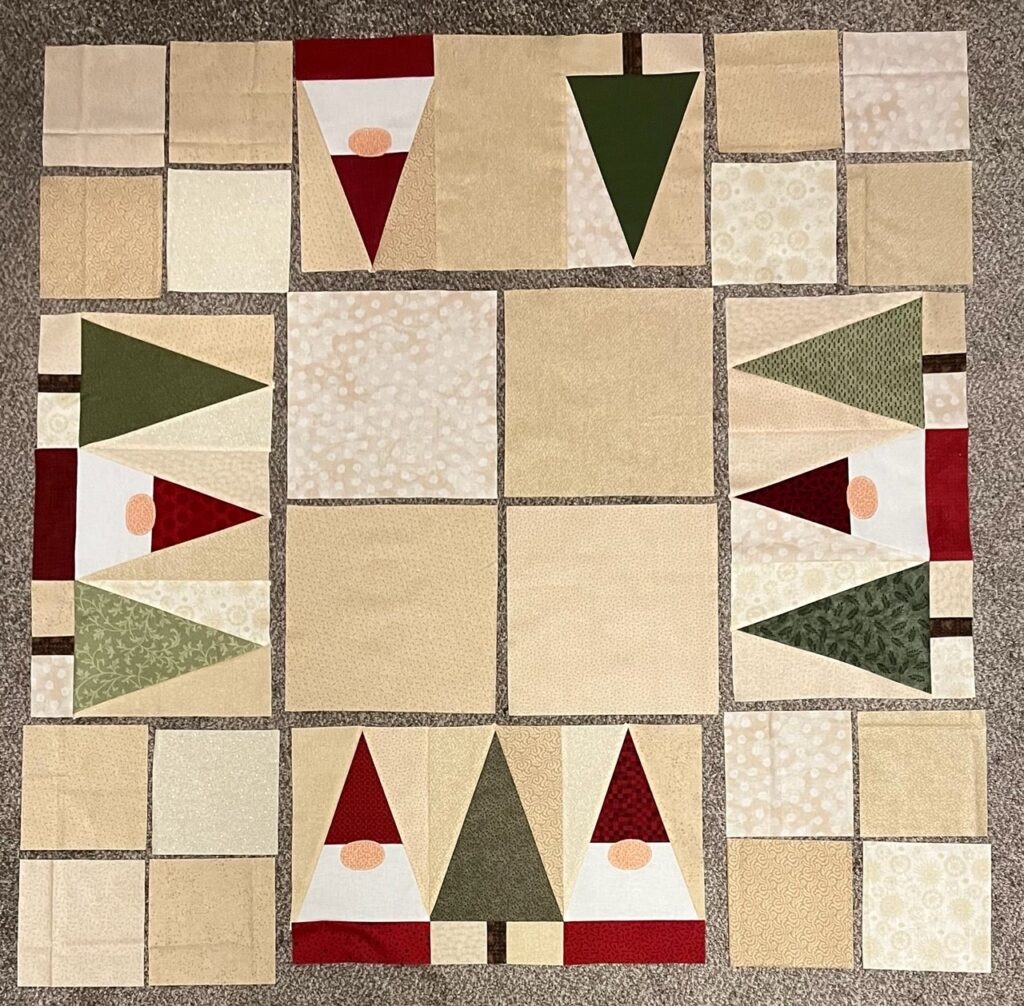
Now that you have all of the blocks sewn and pressed, it’s time sew them together! Lay out the gnome, balsam, and four patch blocks in the layout shown here. You’ll sew the top together in rows, then sew the rows together to complete the top.

Place the 7 ½” x 12 ½” cream rectangle in the middle of Row 1 between the gnome and the balsam. Sew the blocks of Row 1 to each other. Press seams to the right.
Sew the left side gnome and balsam blocks of Row 2 to each other, and sew the right side gnome and balsam blocks of Row 2 to each other. Press seams either toward the top or bottom. Then sew each set of gnome/balsam units to the center block. Press seams to the left.
Sew the blocks of Row 3 to each other. Press seams to the right.
Now sew Rows 1 and 2 together, nesting seams. Press seam toward Row 2. Sew Row 3 to the bottom of Row 2, nesting seams. Press seam toward Row 2.

Layering the Top, Batting, and Back
I refer to layering the quilt as “sandwiching”. You need to sandwich the top and back with the batting in the middle.
Tape the Backing Down
On a large table or the floor, use masking or painter’s tape to tape down the backing fabric. As you tape the back you’ll want to make sure the fabric is smooth, without wrinkles. Also, make sure the right side of the fabric is facing down!
Add the Batting
Lay the batting on top of the taped-down quilt back, and move your hands across it to smooth it all over. This will get rid of any wrinkles in the batting, and help to adhere it to the backing fabric.
Place the Quilt Top
Once you have the batting placed on top of the quilt back, center the quilt top over the two bottom layers. Right side facing up, of course! The two bottom layers of the quilt (the back and the batting) should extend about 3” all around the outside edges of the quilt top.
Move your hands across the quilt top to smooth it all over, and help remove any wrinkles. This will also help adhere the quilt top to the batting a little bit.
Baste the Layers
Once you have the top of the quilt all smoothed out, use large safety pins to baste all three layers together. I like to use 1 ½” stainless pins for basting.
Starting in the middle and working your way outward, put a pin around the entire quilt sandwich every 4-5 inches so the three layers don’t move around when you’re machine quilting this project. You really don’t want to use more pins than this or you’ll be needing to stop a lot when you’re quilting to remove pins, which upsets the mojo of your quilting rhythm, lol!
“Quilting” the Quilt
Use whatever free-motion stitch you’d like. You’ll need a darning foot to free-motion quilt on your domestic sewing machine, and you’ll need to either be able to lower the feed dogs on the machine or place a special cover over them. If you’re using a straight stitch to machine quilt you’ll need a walking foot to allow the layers to move smoothly through the sewing machine without bunching up. You could also hand quilt or tie to secure the layers together.

Making the Opening and the Center Hole
Once your layers are quilted together you’ll need to cut an opening up the back and in the center so you can get your tree skirt around the tree trunk.
Line up the lines on Template E to the seams on the center four patch block. Use a marking pen or fine pencil to trace the outer circle onto the center of the quilt top.
Use your plastic ruler to draw a line from the center of the quilt to the edge of Row 1. The line will follow the seam of the center four patch block and go through the center of the 7 ½” x 12 ½” cream rectangle.
Sew a basting stitch ¾” on each side of the straight line and ¼” around the center circle line. This will stabilize the quilting as you make the necessary cuts and sew on the binding.
I know it’s a bit scary, but you’ll now need to cut the opening. Don’t worry, your basting stitches will hold all of your beautiful quilting in place! Use your plastic ruler and rotary cutter to cut ½” on each side of the straight line that you drew up the middle to the center. This will give you a 1” opening up the back.
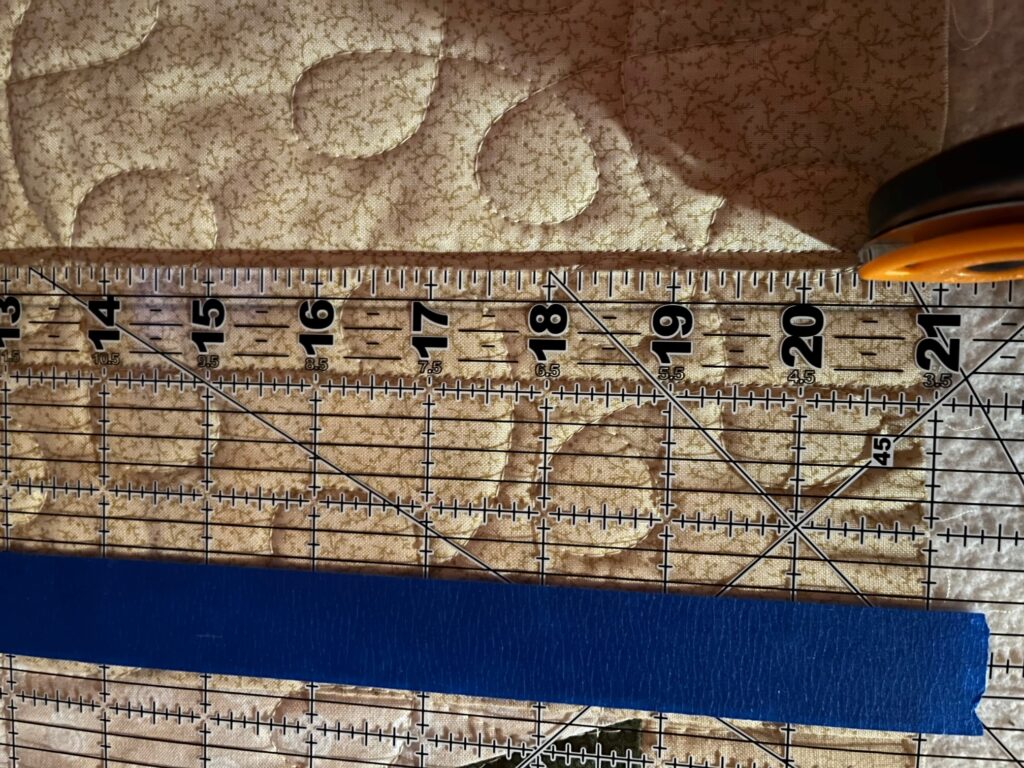
Then use your scissors to cut along the circle line that you drew to create the hole in the center.


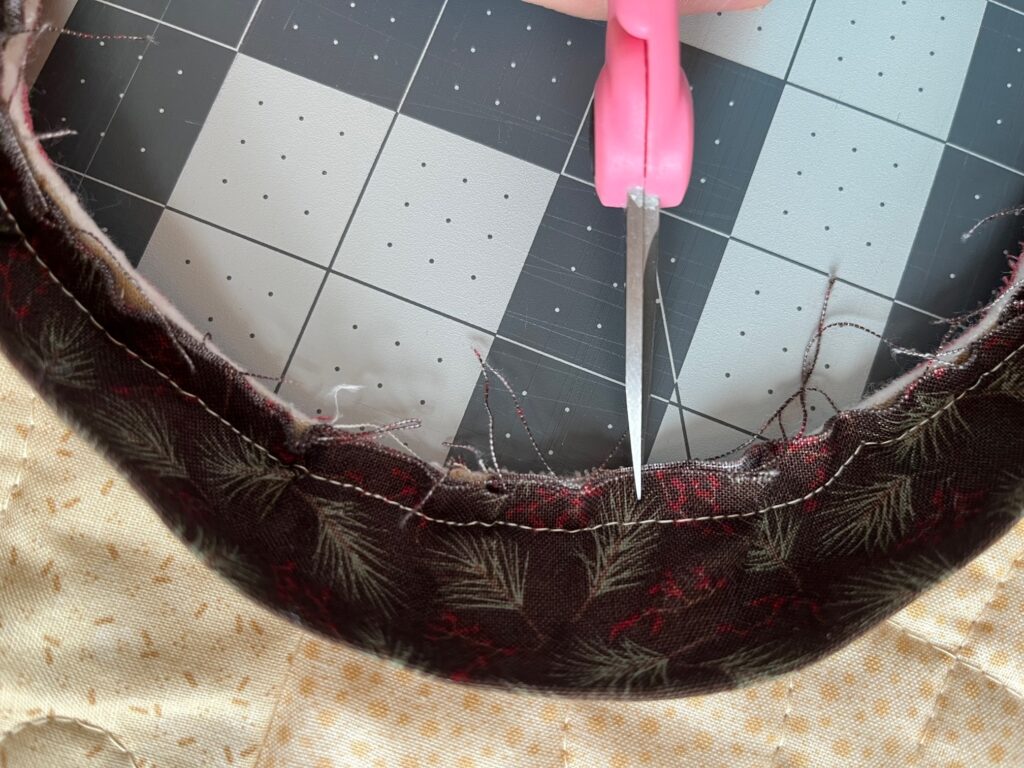
Now that you have the center hole cut, use a scissors to snip a teeny ⅛” cut around the center hole every ½” or so. You’ll want to be pretty prudent doing this so you don’t snip through your basting stitch that you made! These snips will allow the center hole to have a bit more give so it’ll be easier to stitch the binding around the circle.
Binding the Quilt
When you’ve finished securing the layers together, and you have your openings cut, it’s time to bind your quilt!
Prepare the Binding
Fold each of the cut binding strips in half end to end. Use the 45° line on your plastic ruler to trim the ends at a 45° angle.
When you open the strips the angles on the ends will be facing in opposite directions.
Place the ends of two strips perpendicular, right sides together, and sew ¼” seam.
Repeat to join all strips into one long binding strip. Press in half lengthwise, right sides facing out.

Sew the Binding to the Quilt
Begin to sew the raw edges of the binding to the quilt by pinning it along one side. Be careful to sew the raw edge of the binding strip to the quilt, not the folded edge!
I usually start sewing the binding strip in the middle of the quilt side that I’m starting with. Start sewing about 12” in from the end of the binding strip, leaving a hanging “tail” on the binding. You’ll sew this to the other end of the binding strip when you finish sewing all along the sides of the quilt. Stop sewing on the first side ¼” from the corner, use a pin to mark this location and sew right up to it. Backstitch a bit, and cut your thread but DON’T cut the binding strip.

Making the Mitered Corners
Now, remove the quilt and binding strip from your machine and fold the binding strip up beyond the quilt edge so it’s perpendicular from the side you were just sewing on.
Fold the binding strip back down on itself and match the fold to the edge of the quilt you just sewed it to, and the next edge of the quilt you’re about to sew it to. Pin this fold in place, and pin the binding strip to this edge of the quilt and continue to sew it, again stopping ¼” from the next corner and repeating the folding process described above.
Sewing Along the Openings
When you get to the opening that goes up to the center of the quilt, stop stitching ½” from the corner (rather than ¼” on the other mitered corners). Miter the corner in the same way, folding the binding up and then down on itself again. Then place the raw edge of the binding along the basting line that you made before you cut the openings. This will be the guide line to stitch the binding up the opening and around the circle. You’ll be stitching ¼” from basting stitch (½” from edge of the cut opening).
Miter the corner of the binding where the circle starts (and again where it ends) just like you do on the other corners of the quilt. Carefully straighten the center circle as much as you can as you pin the binding to the basted guideline along this area of the quilt. Sew slowly to minimize puckering.
Connecting the Ends of the Binding
Continue sewing on the binding, mitering corners as you come to them, until you are on the last side of the quilt, the side you started on.
Stop stitching about 12” from where you started. Backstitch and cut the thread (but not the binding strip, not yet!), remove the quilt and binding strip from the machine.

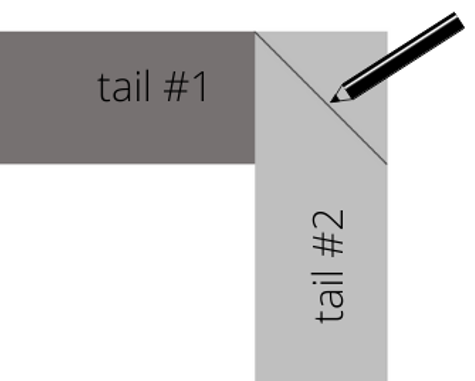
You now have two “tails” of the binding strip, tail #1 from where you started stitching it to the quilt and tail #2 from where you ended. You’ll need to join these tails together so that you have a continuous binding strip to finish sewing onto the quilt. Follow the steps below to join the tails!
STEP 1
Lay tail #1 of the binding strip along the unsewn edge of the quilt. Trim it at a 90° angle about half way between this unsewn edge.

STEP 2
Lay tail #2 of the binding strip over tail #1 along the unsewn edge of the quilt. Measure 2 ½” beyond the trimmed straight edge of tail #1. Mark this 2 ½” measurement with a pin or pencil, and trim the tail #2 at a 90° angle also. The two trimmed binding strip tails should overlap by 2 ½”.

STEP 3
Unfold the two tails so they lay flat. Pin the two tails together perpendicular to each other (right sides together). Use a fine pencil to draw a diagonal line from the corner of tail #2 to the opposite side, as shown here.
Sew along the drawn diagonal line. Trim the outside corner ¼” from the seam and finger press the seam open. Fold binding strip in half again, lengthwise. The continuous binding strip should now lay flat along the unsewn edge of the quilt. Finish sewing the binding strip to the quilt.
Trim the Batting and Back
Trim the batting and quilt back to ¼” from the edge of the quilt top. I use a ruler and a rotary cutter to accomplish this task. Work carefully, so you don’t cut into your quilted project! The opening should already have a ¼” batting/backing overhang, so there’s no need to trim the opening.

Hand-Stitch the Folded Binding Edge to the Quilt Back
Hand-stitch the folded edge of the binding strip to the back of the quilt. When you get to the corner, carefully turn the corner right-side out to make a crisp, mitered corner. I tack a few stitches up the corner to hold it in place, and then continue stitching along all sides and corners.

This Balsam Gnomes tree skirt finishes up to be 45” x 45” in size. The widest point, corner to corner, measures about 64″.
I hope you have fun following this Christmas tree skirt tutorial, and have just the best Christmas ever!!


Absolutely love it. And thanks for the binding directions as well. How fun to have the skirt and the quilt and maybe a stocking? to match. Thanks
Thank you, and you’re welcome!! This is such a fun design. Yes, stockings! I need to design stockings, and I’ve got more gnomes up my sleeve!! Check back or sign up for the newsletter to keep up to date on new releases =) So many gnomes, so little time, lol!!
[…] Gnome Series like the Balsam Gnomes Quilt, the Balsam Gnomes or Birch Gnomes Table Runners or the Balsam Gnomes Christmas Tree Skirt (a super fun Christmas quilt pattern!!!). As always, these patterns are available as downloadable […]