I’m so excited to share how to make a pet quilt with upcycled fabric that I made for Maggie! I wanted to get this pattern published as folks were still thinking about Earth Day and what they can do to help contribute.
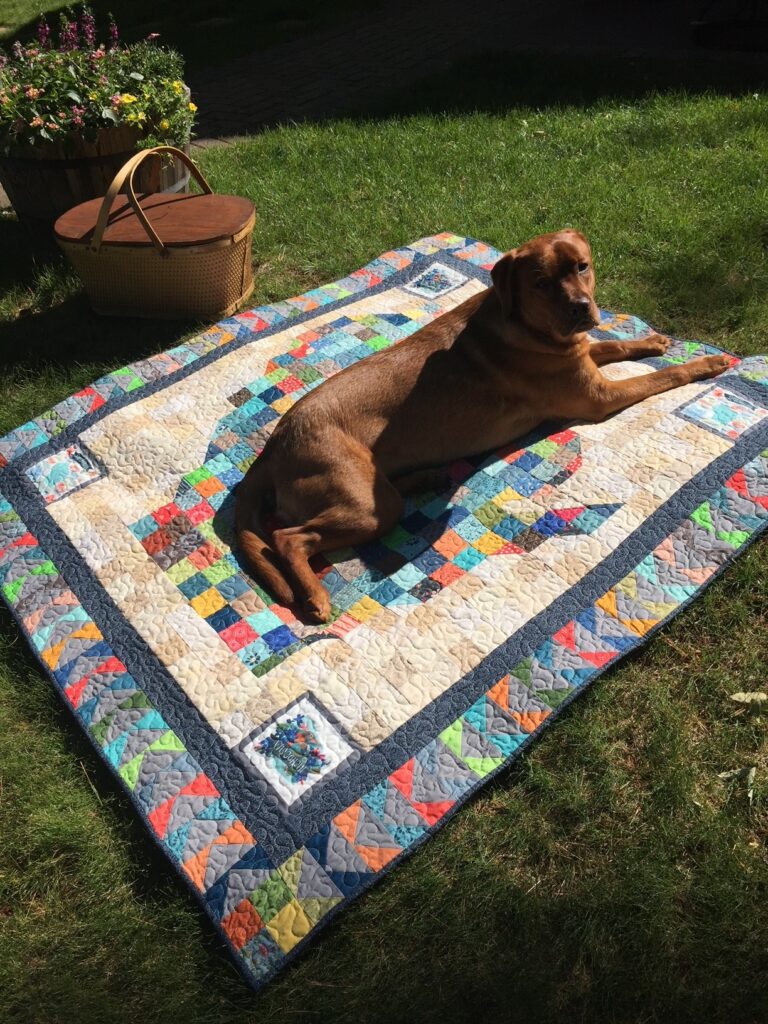
For those of you who don’t know, Maggie is our grand dog. She is a fox red lab, and is one of the sweetest Labrador retrievers I’ve ever known, and she thinks all the quilts I make are for her. She loves to be cozy and lay on quilts!! So I just had to make her a cozy quilt of her very own!!


I decided it would be one of her Christmas gifts, and I knew I wanted to use scrap fabric for Maggie’s quilt. This was a great project that was a fun way to be eco-friendly and make Maggie happy. Win, win!!!

When I thought about the fabric to use for this pet quilt, I wanted to repurpose clothing rather than using new fabric. I wanted texture, so out of all the fabric families I decided to use corduroy clothing for Maggie’s pet quilt.
Textile Waste
Each year thousands of pounds of clothing items end up in landfills as textile waste. Ugh! If more people explored their local thrift store and bought clothing to use or upcycle, it could be a good way to make an impact.
I just think cutting up old jeans, jackets, and skirts into scrap fabric to be sewn into new quilts is one of the easy ways I can help make a difference. And I had so much doggone fun this past year collecting the corduroy items for Maggie’s quilt, lol!!
If you’re looking for a great idea to make kennel quilts for your local animal shelter or for your best friend with four legs, I hope my free patterns (including this one) will help you make little quilts for your fur babies! My easy sewing projects are written with the beginning quilter in mind who is maybe making their first quilt.
When folks were locked down during the pandemic, this would have been a great project to clear out your closets and get rid of unwanted clothes to make up a pandemic quilt!
Also as a switch, you could also use this pattern and clothing from a loved one to make a memory quilt for yourself or your family members. The directions would work well for this type of project also!
Post contains affiliate links and we earn commissions if you shop through the links on this page, including Amazon Associate links. For more information please read the disclaimer on the Privacy Policy page.
Collecting Clothing to Repurpose
I started off choosing the colors I wanted to incorporate into Maggie’s quilt. She’s a girly girl, so pink had to be front and center! Maggie’s favorite color is pink!!


I actually found an old sheet in one of my first thrift store searches to use for the quilt backing, and the colors in the sheet set the stage for my color palette! Light pink, dark pink, orange, dark orange, and tan were the colors I chose to go with!

I searched for corduroy men’s slacks and found a ton of tan ones! Tan is a great background fabric to use with the pinks and oranges. Then I went over the ladies and girls racks and found larger sizes of girls slacks for my pinks, dark pink, and orange corduroy clothing to use.
It took me about four trips to various thrift stores to find a variety of clothing items to use in the quilt. It was like a fun treasure hunt!!

Fabric Requirements
I didn’t know exactly how much fabric I would need, so I just bought a nice selection of clothing items and decided to shop for more as I needed to. But I didn’t need to! I wanted my unfinished squares to measure 6 1/2”.
Luckily, I had the perfect amount of clothing needed to cut apart into all of these larger pieces! I even had some leftover bits of fabric that I can use in the future to cut into small pieces to if I want to make more little quilts.
I think I’m hooked on using fabric scraps from old clothing! I’m keeping the leftovers in a scrap bag to be used for a future pet project. You could make a little play mat for a kitty, or other great gifts for a furry friend. Quilts would make a great focal point for pet portraits!!
I suggest purchasing 8-10 clothing items to cut apart into quilting fabric. The good news is that there isn’t a correct answer to the number of clothing items needed or the shape, color, or fabric type.
You can use corduroy like I did, or even use cotton flannel for a cozy little pet quilt. I do suggest using fabrics with natural fibers so they wash up well.
Cutting the Clothing into the Largest Pieces
I cut the clothing apart on the seams so the fabric laid flat to cut into squares. The largest pieces can be cut from the tops of the pant legs, as you go further down on the leg the width usually gets narrower.


For this pattern you’ll need to cut 81 – 6 1/2” squares. Using 6 1/2″ squares the quilt finished up measuring 54″ x 54″ when it’s completed.
I used my 6 1/2” plastic ruler and rotary cutter which made cutting this size square a breeze! The plastic ruler will allow for straight lines as you cut apart the clothing into squares.

If the clothing you’re using doesn’t allow for 6 1/2” squares, you can adjust the pattern and make a smaller quilt using all 5 1/2” squares, or even 3 1/2” squares out of smaller scraps.
Following the same design, using 5 1/2” squares you will end up with a 45” x 45” quilt, and 3 1/2” squares will give you a 36” x 36” quilt. The perfect size to line a pet bed!
You’ll need the following:
Light pink requires 16 – 6 1/2” squares.
Dark pink requires 28 – 6 1/2” squares.
Orange requires 7 – 6 1/2” squares.
Dark orange requires 8 – 6 1/2” squares.
Tan requires 22 – 6 1/2” squares.


Backing, Binding, and Batting Measurements
I used a sheet that I picked up from the thrift store for the backing.
You could also use shirts cut into large pieces and pieced together for the backing. Or you could piece together fabric that isn’t your favorite and make a hodge podge patchwork backing. The backing needs to be 60” x 60” so it extends a few inches beyond the edges of the quilt top.
Cut 6 – 2 1/2” width of fabric strips for the binding. Or…cut 2 1/2” strips from the thrift store clothing and piece it together to form a strip about 225” long.
Prepare the Binding
Fold each of the cut binding strips in half end to end. Use the 45° line on your plastic ruler to trim the ends at a 45° angle.
When you open the strips the angles on the ends will be facing in opposite directions.
Place the ends of two strips perpendicular, right sides together, and sew ¼” seam.
Repeat to join all strips into one long binding strip. Press seams open, then press long strip in half lengthwise, right side facing out.
Piece Left Over Batting
I pieced large pieces of left over batting for the center of this quilt. Cut edges of the batting with a rotary cutter and plastic ruler so they are straight. Feed the batting through your sewing machine with the edges touching or overlapping just a little bit. To piece the batting together use a zigzag stitch. Trim the batting to 60” x 60” so it is the same size as the quilt back.
Arrange the Squares into the Quilt Design
I decided to use an around the world type of design for Maggie’s quilt! You wouldn’t have to use this design, I just thought it would be fun. I encourage you to make up your own patchwork pattern to use on your quilt if you need to!

Lay out the squares on the floor or a design wall, and arrange them into the pattern. Once I had the design arranged, I made stacks of each row. I separated the stacks by large pieces of paper. This was a great way to keep them in order.

General Sewing Directions
The directions for this quilt are for rotary cutting, machine piecing, machine quilting, and the binding is hand-stitched to the quilt back.
Accurate cutting and sewing enhances your final product. Pin your pieces together before sewing them to ensure proper seam alignment.
Use a ¼” seam allowance. I recommend using a special presser foot with a ¼” guide if you have one for your machine. This will help you get uniform seams, and matching corners!
Follow the directions described below as you press open the seams. Each individual row is pressed in the opposite direction of the previous row to eliminate bulk and help seams to lay flat. Rows sewn together are then all pressed in one direction for a uniform look.
Sew the Squares into Rows
Use a 1/4” seam allowance to begin sewing the fabric squares into rows. You can chain piece the pieces to save a bit of time and thread.

I like to lay the stacks of rows next to my sewing machine and chain piece two rows at a time. Otherwise it gets a little hard for me to keep the rows in order.
Press the seams of each row in opposite directions. Press rows 1, 3, 5, 7, and 9 to the right. Then press rows 2, 4, 6, and 8 to the left. This way the seams will nest when you sew the rows together.
Start to sew the rows to each other with placing row 1 and row 2 right sides together. Nesting seams, place a pin in each seam area to hold it in place. Sew the rows together.
Once all the rows are sewn to each other, press the seams either upward or downward so the quilt top lays flat.
Layering the Top, Batting, and Back
I refer to layering the quilt as “sandwiching”. You need to sandwich the top and back with the batting in the middle.
Tape the Backing Down
On a hard surface floor, or with two large tables pushed together, use painter’s tape to tape down the backing fabric. As you tape the back down you’ll want to make sure the fabric is smooth, without wrinkles. Also, make sure the right side of the fabric is facing down!
Add the Batting
Lay the batting on top of the taped-down quilt back, and move your hands across it to smooth it all over. This will get rid of any wrinkles in the batting, and help to adhere it to the backing fabric.
Place the Quilt Top
Once you have the batting placed on top of the quilt back, center the quilt top over the two bottom layers. Right side facing up, of course! The two bottom layers of the quilt (the back and the batting) should extend about 4” all around the outside edges of the quilt top (2” for the pillow).
Move your hands across the quilt top to smooth it all over, and help remove any wrinkles. This will also help adhere the quilt top to the batting a little bit.
Baste the Layers
You can either spray baste your quilt layers or pin them together with 1 ½” stainless pins. Place pins around the entire quilt every 4-5 inches so the three layers don’t move around when you’re machine quilting this project. Again, make sure all wrinkles are smoothed out. Adjust basting if needed to remove any wrinkles.
“Quilting” the Quilt
Use whatever free-motion stitch you’d like, or use a straight stitch to quilt in the ditches or along the seams. You’ll need a darning foot to free-motion quilt, and you’ll need to either be able to lower the feed dogs on the machine or place a special cover over them. If you’re using a straight stitch to machine quilt you’ll need a walking foot.
I was able to quilt Maggie’s upcycled fabric pet quilt using my quilting frame and computerized quilting system.

Sew the Binding Strip to the Quilt
Begin to sew the raw edge of the binding to the quilt by pinning it along one side. Be careful to sew the raw edge of the binding strip to the quilt, not the folded edge!
I usually start sewing the binding strip in the middle of the quilt side that I’m starting with. Start sewing about 8” in from the end of the binding strip, leaving a hanging “tail” on the binding. You’ll sew this to the other end of the binding strip when you finish sewing all along the sides of the quilt.
Stop sewing on the first side ¼” from the corner, use a pin to mark this location and sew right up to it. Backstitch a bit, and cut your thread but DON’T cut the binding strip.
Making the Mitered Corner
Now, remove the quilt and binding strip from your machine and fold the binding strip straight up so it’s perpendicular from the side you were just sewing on.
Fold the binding strip back down on itself and match it to the edge of the quilt you just sewed it to, and the next edge of the quilt you’re about to sew it to. Pin this fold in place, and pin the binding strip to this edge of the quilt and continue to sew it, again stopping ¼” from the next corner and repeating the folding process described above. Continue in this manner until you are on the last side of the quilt, the side you started on.
Connecting the Ends of the Binding
Stop stitching about 14” – 16” from where you started. Backstitch and cut the thread (but not the binding strip, not yet!), remove the quilt and binding strip from the machine.
You now have two “tails” of the binding strip, tail #1 from where you started stitching it to the quilt and tail #2 from where you ended. You’ll need to join these tails together so that you have a continuous binding strip to finish sewing down to the quilt. Follow the steps below to join the tails!
STEP 1
Lay tail #1 of the binding strip along the unsewn edge of the quilt. Trim it at a 90° angle about half way between this unsewn edge.
STEP 2
Lay tail #2 of the binding strip over tail #1 along the unsewn edge of the quilt. Measure 2 ½” beyond the trimmed straight edge of tail #1. Mark this 2 ½” measurement with a pin or pencil, and trim the tail #2 at a 90° angle also. The two trimmed binding strip tails should overlap by 2 ½”.
STEP 3
Unfold the two tails so they lay flat. Pin the two tails together perpendicular to each other (right sides together). Use a fine pencil to draw a diagonal line from the corner of tail #2 to the opposite side, as shown here.
Sew along the drawn diagonal line. Fold binding strip in half again. The continuous binding strip should now lay flat along the unsewn edge of the quilt. If necessary, shorten or lengthen the continuous strip before trimming it. Then trim the outside corner ¼” from the seam and finger press the seam open. Fold it in half again and finish sewing the binding strip to the quilt.
Trim the Batting and Back
Trim the batting and quilt back to ¼” from the edge of the quilt top. I use a ruler and a rotary cutter to accomplish this task. Work carefully, so you don’t cut into your quilted project.
Stitch the Folded Binding Edge to the Quilt Back
Here is my FAVORITE part of the process! Either machine-stitch or hand-stitch the folded edge of the binding strip to the back of the quilt. I knew Maggie wouldn’t mind if her binding was less fancy than my regular quilts, so I chose to machine-stitch the binding to the back of the quilt.
When you get to the corner, carefully turn the corner right-side out to make a nice, mitered corner. I tack a few stitches up the corner to hold it in place, and then continue stitching along all sides and corners until…VOILA! Your binding is complete!


I even added a label to the back of Maggie’s quilt!


Maggie had so much fun opening her quilt and enjoying it on Christmas Eve! She patiently waited to open her gifts!!

At the end of a long day of playing with her Christmas gifts she took a nap on her quilt!

I’m pretty sure she had “visions of sugar plums” or crunch doggy treats dancing in her head!

If you liked this pattern, check out some of my other free patterns for beginning quilters like “Springtime”, “Friendship Wreath”, or “Sweet Pea”.
All of my other patterns are available as ad-free, digital downloads on my Etsy shop. Check them out!
My patterns are also available on FaveQuilts.
If you’re looking to purchase any fabric or supplies, the Fat Quarter Shop or Connecting Threads are great resources!!
Happy Quilting!!